Introduction
This wiki is maintained and written by @muuyo, with the original pages (and nearly all development tools and custom projects!) written by @WistfulHopes
Welcome to the Arc System Works modding wiki!
This is meant to act as a centralized avenue for information gathered by myself and the community as to modding these games. As Arc System Works has modified Unreal Engine for their own purposes heavily, and done many strange deeds in the process of doing so, a wiki has grown increasingly necessary to make everything a bit more digestible and organized.
This is further compounded by the fact that the tools and avenues for modding are growing old with time; better methods to do things, and methods that have grown less and less useful still being referenced in old video guides. As well, the best bet for many things is to delve into a Discord, and search channels for keywords.
This wiki aims to fix this. I've aimed to format it to be as linearly digestible as I can, with each section laid out in turn.
Note that Guilty Gear Strive is the modding game of choice for the only editor (muuyo); as such, information on other games is welcome. Please either contribute to the Github or ping me directly for anything quick that would be helpful to add. However, I'm but one man, and my attention is terrible, so I may take a while to get to it.
As well, if you really wish to financially support (though completely unnecessary), the profiles linked above have donation links.
Modding For Dummies
This section was written by @muuyo
Hello! As this wiki is decently in-depth and fragmented into different topics due to the nature of things, this is meant to be a "quickstart guide" for anyone stumbling in that doesn't really know where to start. It's also fairly in-development, so contributions are welcome - I'll just be slow to merge if they're not to standards (bad grammar or explanations, etc)
If you're looking to mod the game, not make mods for it, please see this page.
You most likely want to start with recolors, as they're the most easily graspable, however if you're more a technically inclined / intuitive person like myself you can jump headfirst into model modding - just know that it's a bit of an in-depth topic, and you'll have to do a bit of discord searching.
On that note, here's the Unreal Anime Mods discord: link. It's obviously a lot less "comprehensive" and structured a place to learn, however realistically you may find yourself having to message search for people with similar issues to you.
Onto the modding! This is all from a Strive modder's perspective, however it should be generally the same as to other games, just with different conventions.
First, you'll need to extract assets from the game. You will most likely want to do this even if you're only making a recolor (to preview your work), but it's not strictly necessary.
There are two tools for this; Umodel and Fmodel.
Fmodel is a more modern piece of software, and as of recent updates the much more suited application for exporting. Umodel is also available, but it's more antiquated and doesn't presently have any advantages, and exports worse files. Next, follow the mesh importing section if you wish to extract models, or simply navigate to any texture and export them as a TGA otherwise.
Next, you will need Unreal from the Installing Unreal page. Download it, set it up as described there, and you're mostly in the money. However, I strongly recommend making a new project, separate from the one with all the game files in it, to work in - start from a clean slate. This is described more in-depth on the Custom Project page, under the dropdown.
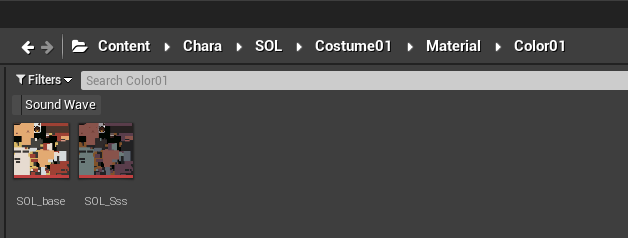
If you're just wanting to do texture work, it's pretty easy - you essentially want to replicate the structure of where you took the file from in Fmodel.
For example, if I want to replace Sol's Color01 base and SSS, I simply have to create the file structure like this: (ctrl+shift+N to make a new folder, btw)
All unreal modding generally takes this workflow - replacing files by putting them in the same place they originally were.
Make sure that your content is saved by hitting File -> Save All, or hitting Ctrl+Shift+S. If any files have a little star on them, they won't properly save.
Finally, you need to cook.
As you get later into working on projects, you will want to use this more, so I'll put it here; under Edit -> Project Settings -> Packaging, you can click the first dropdown (little arrow under the first section) to expand it and see these two settings. They are Quite Important.
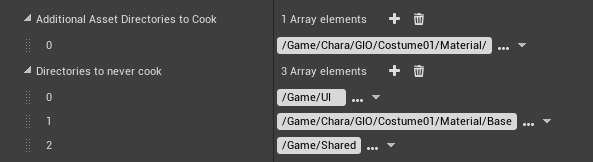
The first one defines directories that you want to cook. Having this set will stop any other directories from being cooked, except Shared.
The second is very important - if you have a Shared folder AT ALL, you need to put it here, or your mod will have averse affects on the entire game for anyone who installs it. Doing just this solves your problem. As well, if you're doing anything material-based, like instancing, you may want to put your Base folder here.
With that all of the way, just hit File -> Cook Content For Windows. This may take a while the first time you do it. If it errors out, see the Custom Project page again, as you likely did not configure your new project correctly.
You're nearly done! Now you need to pack up your files. View the packing page for more details.
Installing Unreal Engine
this section was written by @muuyo
Arc System Works has customized various aspects of Unreal Engine 4 to suit their needs.
This means that although we can install the plain vanilla UE4 and use that to make mods, we'd be missing on key features needed to make them work properly. Thankfully, Ryn has reverse-engineered several of these changes and implemented some of the key features we require into custom UE4 builds.
You can find the download links below. Just pick the one matching the game you wish to mod. Note that the exact version is important; you cannot do things like use UE4.27 to mod DBFZ.
| Game | Engine |
|---|---|
| Dragon Ball FighterZ | Unreal Engine 4.17 |
| Guilty Gear -Strive- | Unreal Engine 4.25 Plus (read below, important) |
| DNF Duel | Unreal Engine 4.25 |
| Granblue Fantasy Versus | Unreal Engine 4.21 |
| Granblue Fantasy Versus Rising | Unreal Engine 4.27 |
The EXE you're going to want to launch to start the project is typically in Engine/Binaries/Win64/.
The Guilty Gear -Strive- editor may receive periodic patches in another archive. You'll need to update it using the steps on the next page for actually setting up the editor.
STRIVE SPECIFICS
So! The upload for Strive above is pre-packaged for convenience, and contains a Readme inside. If this link is down, or you'd rather just the "original" from Ryn rather than it prepackaged, follow the below;
Dropdowns:
Manual setup
Download here: https://drive.google.com/drive/u/0/folders/16hIM2Gy7V2Vcc3cpj10nY4emUhqmJwd7
Strive has a bit of extra setup that you'll have to do to get it working!
First, you'll want to download all 3 files from the above link.
Extract GGSTCookedEditor anywhere, and you'll have 2 folders: RED and Engine.
Extract CookedEditor_Patch into the same folder, merging RED with RED and Engine with Engine.
Drag the Content_Patch contents into RED, then you can go into RED/Binaries/Win64 to launch the Unreal editor.
To make a new project to do your own work in, you'll have to follow the directions on the custom project page.
Currently, there's an updated ver of the CharaMaterial folder as well; use this or things bug out. download from this repo here then extract it like the above; go into RED/ (your project's folder) then copy Content into there, replacing files when prompted.
Troubleshooting issues
A few things might crop up; some Windows being super annoying, some user error.
This error is thrown if the Strive files aren't set up. Run the batch file in the main directory of the download. It needs to have the pak set up (it needs the original game's pakchunk0-WindowsNoEditor.pak in RED/Content/Paks.
An error containing Error: Failed to load script DLL: [LONG STRING]: Could not load file or assembly 'AutomationScripts.Automation, Version=4.0.0.0, Culture=neutral, PublicKeyToken=null' or one of its dependencies. Operation is not supported., or something similar:
Windows gets pissy when you download files from other people; navigate to the file it's specifying above in the [LONG STRING] bit. For example, AutomationScripts.Automation.dll; go there, right click that file, and go into Properties.
There should be a little box at the bottom saying "Windows blocked this to protect your computer; Unblock", tick that and hit Apply. You might have to do this multiple times.
The symbolic link doesn't work;
When running MakeSymbolicLink.bat, you should get an output with symbolic link created for (...).
If you don't, the symbolic link probably didn't work!
You'll have to make a symbolic link in UnrealEditor/RED/Content/Paks/ to (wherever you have strive installed)GUILTY GEAR STRIVE\RED\Content\Paks\pakchunk0-WindowsNoEditor.pak.
Here's a guide on making them.
After downloading this copy of UE4, simply extract it somewhere not managed by Windows (this means not your desktop, downloads, or other locations in your User folder).
Then, run MakeSymbolicLink (see Troubleshooting if it doesn't work) then one of the Project batch scripts to get started!
RED's project will have all game assets; I would treat this as primarily read-only. Unreal doesn't play nice with modifying the assets here unless you do some trickery, and it's mainly useful for viewing particle effects to find what to modify, and the like. You can also use it to save some Arcsys-specific assets, such as data assets, to do a bit more involved modding.
The Empty project is set up so you can get started instantly. All settings are already set up to make life easy, and the Shared folder has all materials you would need for instancing / duplicating and modifying set up. Treat this as your working folder.
Finally, - MuuyoTools is a place for a few things I deem excessively helpful. AutoPakker.bat is the main focus, letting you skip ALL manual cooking steps and makes it a one-click process. config.txt may need editing if things don't work. Fairly simple script.
Getting the project for your game
The prebuilt custom projects provide all of the custom asset types the game supports, and for newer games, they even include many assets from the game, such as UI elements or data tables.
Below are download links for each game:
- Dragon Ball FighterZ custom project
- The original Granblue Fantasy Versus does not have a custom project.
- Guilty Gear -Strive-'s custom project is bundled with the editor.
- DNF Duel custom project
- Granblue Fantasy Versus Rising custom project
[dropdown] Guilty Gear-specific information
You will need to extract a few things;
- Extract
GGSTContent_Patch.rarintoRED. - Extract
GGSTCookedEditor_Patch.rarto merge bothEngineandREDfolders from the archive to the game.
The Guilty Gear -Strive- custom project does not come with content by default. To get the content, you can copy pakchunk0-WindowsNoEditor.pak from your copy of Strive into RED\Content\Paks. If the Paks folder does not exist, create it.
Alternatively, you can create a symbolic link in Windows by either using one of the tools on the linked page or opening a Command Prompt in the RED/Content/Paks directory and using a command like this:
mklink pakchunk0-WindowsNoEditor.pak "C:\Program Files (x86)\Steam\steamapps\common\GUILTY GEAR STRIVE\RED\Content\Paks\pakchunk0-WindowsNoEditor.pak".
This saves around 30 GB of hard drive space, since you're not duplicating the files in two places - and it will also update automatically. If this doesn't work, run as administrator - I also wasn't able to do this in Powershell, only Command Prompt.
Finally, if you don't want to do active work in the Advanced Project (due to the quantity of files), you can create a new project under the File dropdown at the top left - however, i've found this has to be "christened" by copying the Config folder from /RED/ (in wherever you downloaded the custom project) into your new project's folder, overwriting as necessary. If this step is not done, cooking won't work.
To open these new projects, you can either open Unreal and use File -> Open Project..., or set Windows to open the .uprojects (from C:\Users\[USER]\Documents\Unreal Projects) with `UnrealEditor\RED\Binaries\Win64\GGSTCookedEditor.exe"
Once you have downloaded the correct project, extract it to your Unreal Projects directory. If you've run the editor before, you can usually find it at Documents\Unreal Projects\. For Guilty Gear -Strive-, the custom project is already part of the editor.
You'll also need a working installation of Microsoft's Visual Studio in order for the editor to be able to compile the project.
- Dragon Ball FighterZ requires Visual Studio 2017.
- Guilty Gear -Strive- is already compiled, so you do not need Visual Studio.
- DNF Duel, and Granblue Fantasy Versus Rising require Visual Studio 2019.
For more information on how to set up Visual Studio for UE4, read the official Unreal Engine documentation.
Starting the editor
Extract all of the contents from the custom UE4 archive you downloaded in the previous step. You can use tools like WinRAR or 7-Zip to do so.
Once that is complete, you can fire up the engine with .\Engine\Binaries\Win64\UE4Editor.exe
The current Guilty Gear -Strive- editor works differently. It will be booted from .\RED\Binaries\Win64\GGSTCookedEditor.exe.
You do not need the Epic Games Launcher for this.
The first boot of the UE4 editor usually takes a while to get going. If you want to check whether it's actually starting or not, open Task Manager (Ctrl + Shift + Esc) and check for high CPU usage. This usually means it's busy compiling shaders.
Once Unreal finishes initializing, you will be met with the Project Browser menu. While you could create your own project from scratch, we highly recommend starting off with one of the pre-made custom projects.
If you are using the Strive version, it instead opens to the advanced project by default. To instead use your own project, please follow the steps on the custom project page to create your own project.
Getting files into UE4
So! This section is going to be a little long.
- Install Unreal using the pages in the "Installing Unreal" and "Starting The Editor" sections on the left sidebar.
- If you're making a new project (which I usually recommend, view on this page) to set it up to use an extra project under the Strive dropdown. This lets you handle your "own" files a lot better.
Textures
- Drag the textures into Unreal where they need to go, then double click them and set SRGB to Off under the "Texture" dropdown. This is required for most textures - but not UI ones, I believe, notably. If you're noticing your character being strangely darker or lighter, check these.
- You can select multiple files and
Right Click > Asset Actions > Bulk Edit Via Property Matrixto edit many at once. The right pane toggles settings on all files. - Proceed to the Cooking section.
Meshes
Okay, so;
- In Blender, make sure you have the FBX export addon (using blender 4.2). The full process is detailed on the Blender page, under the FBX section.
- Make sure you're going to handle Outlines using one of the methods in the Outlines page
- Export the file as you need. Make sure to check the Blender page above that you've got the correct export settings!
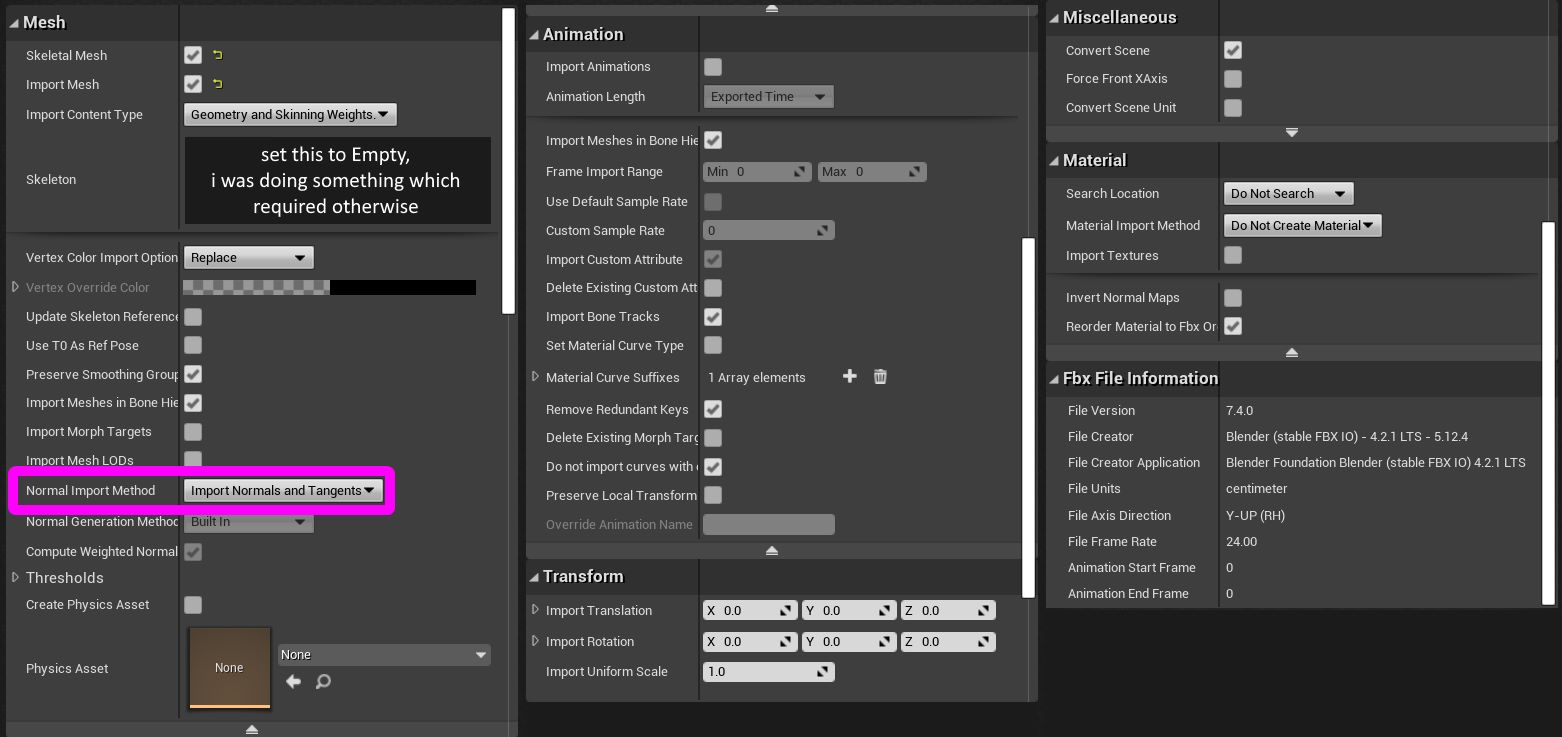
- Drag it into your character's Mesh folder. Use these specific settings, mostly all necessary:
- Proceed to the cooking section.
Cooking
You may want to know that I have scripts that automatically cook, copy, and pack the files all automatically! They're on the user-made tools page. Below config settings still apply.
To make sure you're only cooking the files you want, hit Edit > Project Settings > (new panel appears) > Packaging.
- Then, click the first dropdown under the Packaging section:
- Disable Share Material Shader Code if it's not already disabled.
- These two sections are of great interest:
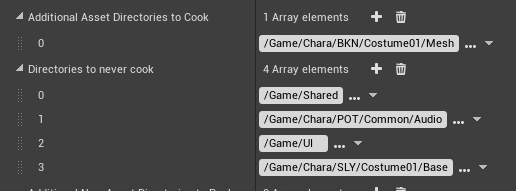
- Additional Asset Directories To Cook specifies the specific directories... you want to cook. Point this to your files if you only want to cook those things; as well, it disables cooking any other files in the project if this is set.
- Directories To Never Cook is nice for disabling things. I recommend putting
/Game/Sharedin here no matter what, as it causes Big Problems if you accidentally cook it somehow.
Now, to actually cook.
Hit File at the top left, then hit Cook Content For Windows.
Wait for this to finish. If it pops up an error, you may have not set up your custom project correctly (or you may have to switch to one); view this section's dropdown for Strive here.
Now that these files are cooked:
- You'll need UnrealPak;
- Copy the cooked files from your cooked folder (such as this, in your project folder:
ProjectName\Saved\Cooked\WindowsNoEditor\ProjectName) to a subfolder of your UnrealPak folder under RED (e.g.,UnrealPak\[AnyProjectNameYouWant]\RED\) - MAKE SURE you delete Skeletons and such for meshes unless you know what you're doing. You want to delete it in the cooking step, so make sure there are no
xxx_body_Skeleton.pak/uexpor anything similar. - Drag this [AnyProjectName] folder onto UnrealPak-With-Compression.bat, it'll create a file called [YourProjectName].pak
- This is your mod! Install it as with any other mod.
- Please note that you'll need a .sig file to go with your mod. For example, this'll look like
- Unverum/Mods/ OR Paks/~mods/
-- ModName
--- ModName.pak
--- ModName.sig
You can use any sig file from any other mod - all are identical. Copy it from anything you have.
Note: Sig file needs to have the exact same name as the Pak. They can both be named anything, but it has to be identical.
Your mod should now work!
External tools
This section was written by @muuyo
Besides Unreal Engine 4 itself, several key pieces of software are used for nearly every aspect of modding these games. They're generally explained on their own pages in other sections.
- FModel
- UModel
- UAssetGUI (my preferred asset editor, as it handles multiple things much better)
- AssetEditor
- Blender. You want version 4.2.
In addition, several specialized tools were written specifically for modding Arc System Works games. However, they are specific in their functionality, so you'll find in their respective sections of this document whenever they are needed.
Using Fmodel
This section was written by @muuyo
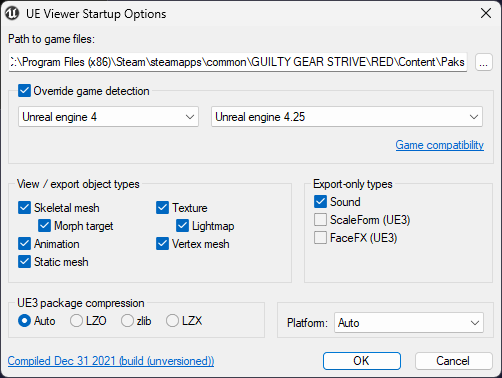
Fmodel is a fairly intuitive piece of software that lets you browse through the game files in a lot less opaque way than Umodel, and as of recently, supports exporting models, materials and animations!
To set it up, you require a bit of legwork.
- Download the most recent release of Fmodel here. Make sure once you download that you're running on the most recent release, by opening Help -> Release and checking if there's more recent versions.
- Put the EXE wherever you'd like (feel free to ignore the other files, they're for compiling)
- Open it, and you'll be presented with a page that looks like this.
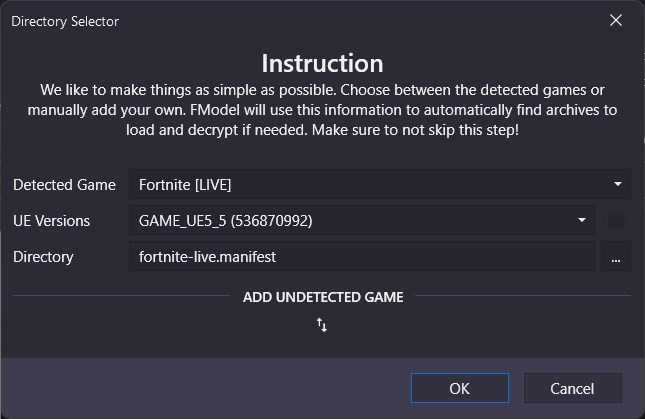
Now, you need to add Guilty Gear as a custom game.
- Click the small two arrows, and put in Guilty Gear Strive then browse to the game's file location on your computer. After, hit the small plus.
- Select this newly added game in the Detected Game section.
- Make sure the box beside 'UE versions' is unchecked, then select "GAME_UE4_25" (for Unreal version 4.25, which the game uses)
- After, you should be prepped to use Fmodel! Hit OK.
- At the top left, click Directory, then input the AES key for your game. This should be at the top of your game's
#XXX-resourceschannel in the Unreal Anime Mods discord.
Then you can double click thepakchunk0-WindowsNoEditor.pakto start browsing the game's files.
Audio support
Please view the audio modding page.
Blender
- You will need the Blender addon linked here to import .ueformat files.
To install the above, click the blue "Code" button followed by "Download Zip".
Then, install the addon like so.
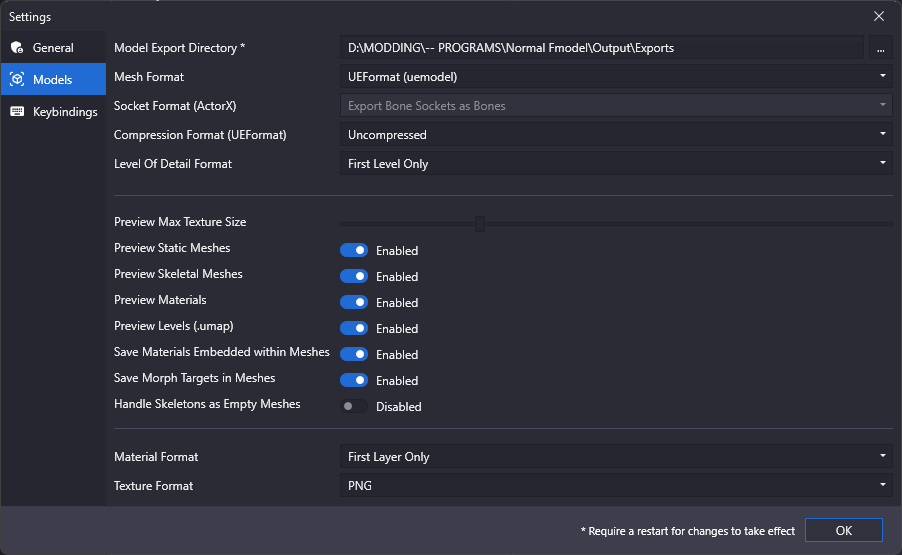
FModel supports exporting models and animations to a new "UEFormat", which is more accurate than either PSK/PSA or glTF. To export to UEFormat, open FModel's settings, then click on the Models tab. Finally, set Mesh Format to UEFormat (uemodel).
Now, you can right-click a model, animation, or folder containing either, and export the models/animations to UEFormat. The attached Blender addon can then import these.
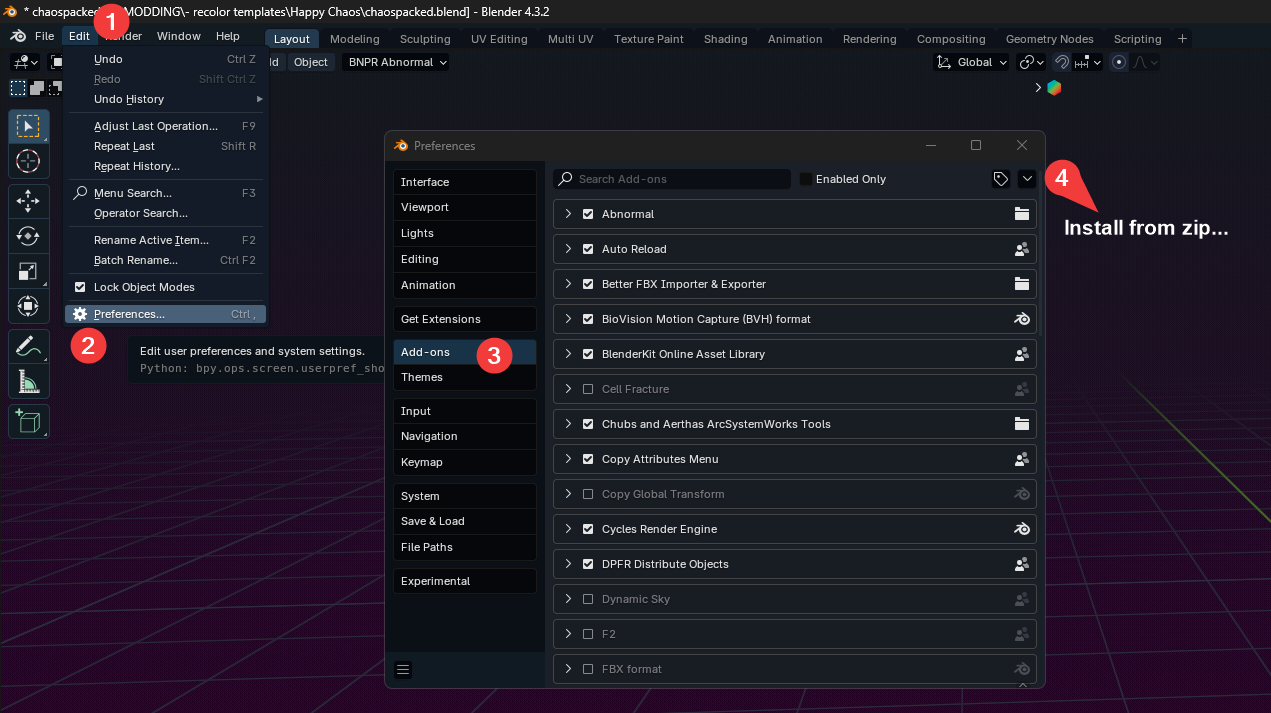
To set up the Blender addon, you will need to download the entire repository (using the blue Code button -> Download Zip)
Then, install this into Blender under Edit > Preferences > Add-ons > top right arrow > Install From Disk...
This document will not be going over how to use Fmodel, however it's fairly self explanatory and it has its own documentation, linked here.
Using Umodel
Installation is fairly simple, however I would like to note that Umodel is an "older" piece of software. Fmodel is what I prefer for browsing assets, but it doesn't export material names - kinda a pain for mesh modding. As such, please use this for it instead;
- Install Umodel from this link (also available in #strive-resources in the discord)
- Get it opened, point it at your game's install directory and force the game override to 4.25
- hit Okay, provide it the AES key
0x3D96F3E41ED4B90B6C96CA3B2393F8911A5F6A48FE71F54B495E8F1AFD94CD73
Steps 2 and 3 will need to be done every time you launch. However, Umodel can be launched with arguments using a shortcut; mine is configured like such in the Target field, set it up as needed.
"D:\MODDING\-- PROGRAMS\umodel_win32\umodel.exe" -gui -path="C:\Program Files (x86)\Steam\steamapps\common\GUILTY GEAR STRIVE\RED\Content\Paks" -game="ue4.25" -sounds -aes="0x3D96F3E41ED4B90B6C96CA3B2393F8911A5F6A48FE71F54B495E8F1AFD94CD73"
Then, move onto mesh importing.
Using AssetEditor
Using UAssetGUI
Using Blender
this section was written by @muuyo
Note that this document will not cover the basics of Blender. This section is thin, apologies.
Blender FBX export into UE4
You are going to need the modded FBX addon by Ryn for anything related to mesh exporting. It can be acquired here.. This only works on Blender 4.3 and below.
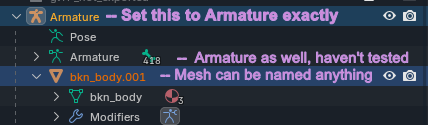
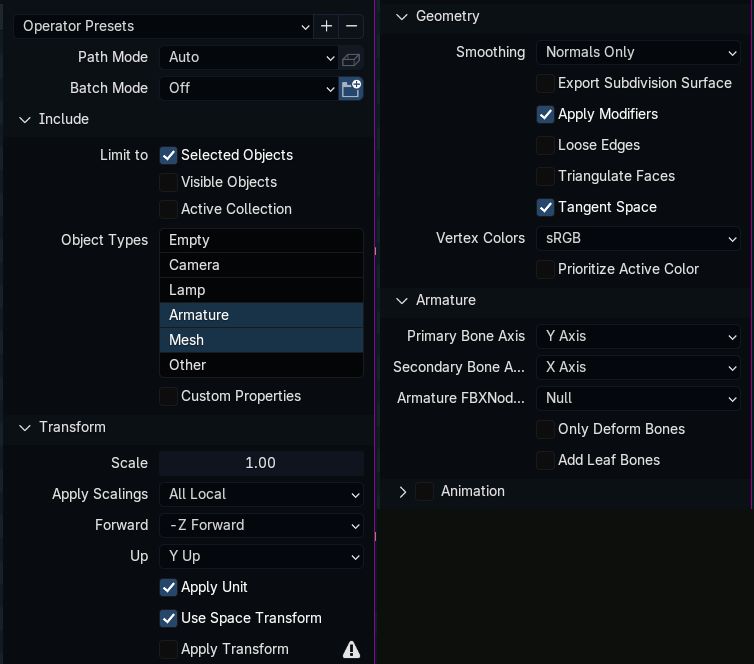
When exporting with this, you first need to set your armature's name to Armature; else, your mesh will be completely invisible. For particle meshes (ones without armatures), this is avoidable. (The below image is a little off; the second Armature can be named anything)
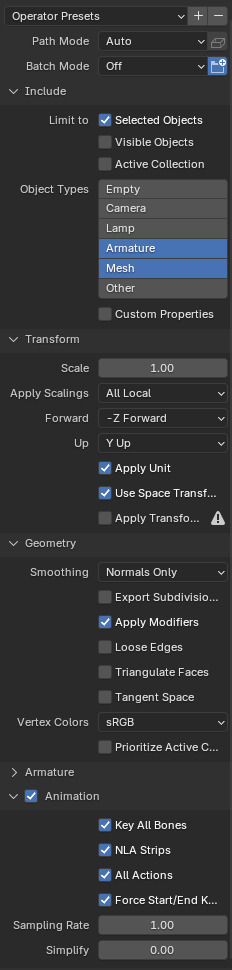
Select your mesh then your armature; then, export with these settings.
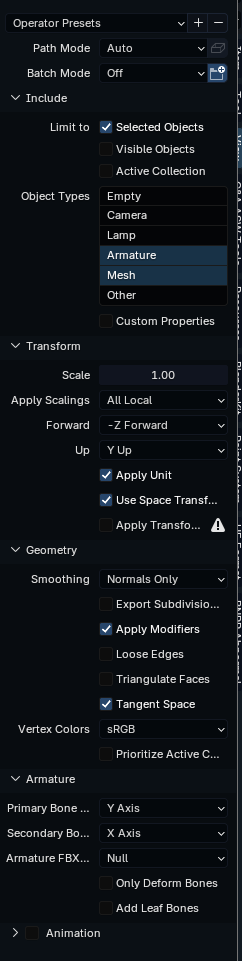
You may want to turn on Triangulate Faces. As well, if your Unit Scale (in your project) is not .01, change Scale to .01. You can save all these settings using the Operator Presets at the top.
Aerthas' custom materials & shaders
Download BLENDER-Arc-System-Works-Shader
While not strictly needed for modding, the shader is highly recommended for previewing models and textures within Blender itself.
Aerthas made a ton of practical videos on how to use his shader. Here is a link to a playlist containing said videos.
Scripts
These scripts have their own wiki pages, which also go into detail on how to use them.
Loose file loading
User-created files
this section was written by @muuyo
This section'll be for generic user files that you may find helpful.
Cooking script
A batch script I personally use to run my cooks automatically. Does the equivalent of going from clicking "Cook Content For Windows" to launching the game.
You'll have to open config.txt in Notepad to change the file locations, first. Man, I hate Batch.
download here!
Texture templates hosted by Lumacosy
a buncha psd texture templates for miscellaneous things. has most characters and few UI assets.
https://drive.google.com/drive/folders/1Llx4qfvOT8LCIkDaxU3QuO38WsyTolaR
Color Cloning Tool
An ABSOLUTE MUST for anyone doing recolors, does pretty much all the work for you.
https://gamebanana.com/tools/17576
Side Flip Material
A replacement for MI_MAIN_BASE that you can instance to have different textures per side of the body.
Set up like a normal material, instance as MI_MAIN_BASE in the color folder and cook.
Merge Content with Content.
flipsides.zip
Troubleshooting
This will, hopefully, serve to be a repository for common issues folk have with different parts of modding ArcSys games. The specific examples will mostly apply to Guilty Gear Strive, however the grand concepts are (as far as I know) the same.
Texture troubleshooting
This section is under construction, and was written by @muuyo
Texture issues are generally low in number, but here is a small overview of possible issues.
TODO: actually write, lol lmao
Mesh troubleshooting
This section is under construction, and was written by @muuyo
This section is where people have the most trouble, and so will likely be very long. The below sections are dropdowns.
Models looking "dehydrated", or just generally really outwardly jagged and weird
The dehydration is, almost always, an issue of the armature applied to your model being incorrectly scaled for one of a variety of reasons. However, the remedy is generally the same:
-
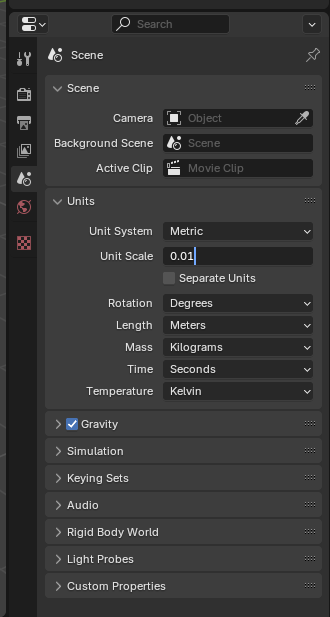
Verify that the unit scale in Blender (under the Properties window, look for the cone tab) is 0.01. This is important! As well, make sure you're using meters.
-
Reimport the source of your skeleton - either from a GLTF from umodel, or a uemodel from Fmodel.
-
Delete the model from this import, as you won't need it; click the skeleton, and hit N to bring up the Viewport sidebar. Under Item, make sure it's a "normal" size; e.g. 2.2 meters, and not 0.022 or 220.
-
If you need to, scale up your model to match the size of the armature that you just imported. Hit S, then type 100 to scale it up by 100x, for example.
-
Select your mesh, then select the new skeleton by control-clicking it, and hit ctrl P then Parent with All Transforms.
-
Now, rename this new armature to Armature as standard, and use it as your new base.
If it's instead jagged and explodey, as best I can put it, it's a very similar issue - go into the armature's Edit or Pose modes and make sure the bones line up with your model. If not, set the Location (under the same sidebar) to 0/0/0 on the Armature, do the same to the Model, and move the model to where it needs to be in order to line up with the Armature.
"These bones are missing from the bind pose" in UE4
You almost certainly have "Add Leaf Bones" on in your Blender model export settings. Please check the Blender page for the correct export settings. You can save these as an Operator Preset so you don't have to redo it every time.
Locations of commonly used assets
This section is under construction, and was written by @muuyo
Partially a personal scratchbook, here's a log of useful locations you may be looking for. You may also want these templates, from Lumy's drive.
Character related images
| Item | Location |
|---|---|
| Character icon in battle | Content/UI/Battle_Xrd3/CharaImage |
| Character gauge icons | Content/UI/Battle_Xrd3/tex |
| Icons used in stage load, the like | Content/UI/Chara_Image_Xrd3 |
| Ranking character images | Content/UI/Ranking/CS_Ranking/tex/RankingCharImage/ |
| Stage, BGM related assets (such as song/stage icons) | Content/UI/StageSelect |
| Some intro images, such as "HEAVEN OR HELL" | Content/UI/Battle_Demo/tex |
Character-specific miscellany
This is a section I'll mainly write for any specific things that are unique to one character (in Strive, for my case, but open to pull requests)
Zato guide
this section was written by @muuyo
My notes from when I was working on this
okay so gonna begin by referencing this snippet from the UAM discord;
hm. okay so
looking in the UE4 red project
all these materials aren't, like, placeholders; these all instance correctly to the normal materials which are fully implemented.
this means i might just be able to cook the Zato folder directly, and I never have to change anything? like no uassets??
we might be so back?
E: lol past muuyo was completely wrong. zato has a good few special materials. however, you CAN just make a material with the same params and then it works if you don't actually cook that.
ERGOOO, i made a few custom mats and now you can cook without as much asset editing!
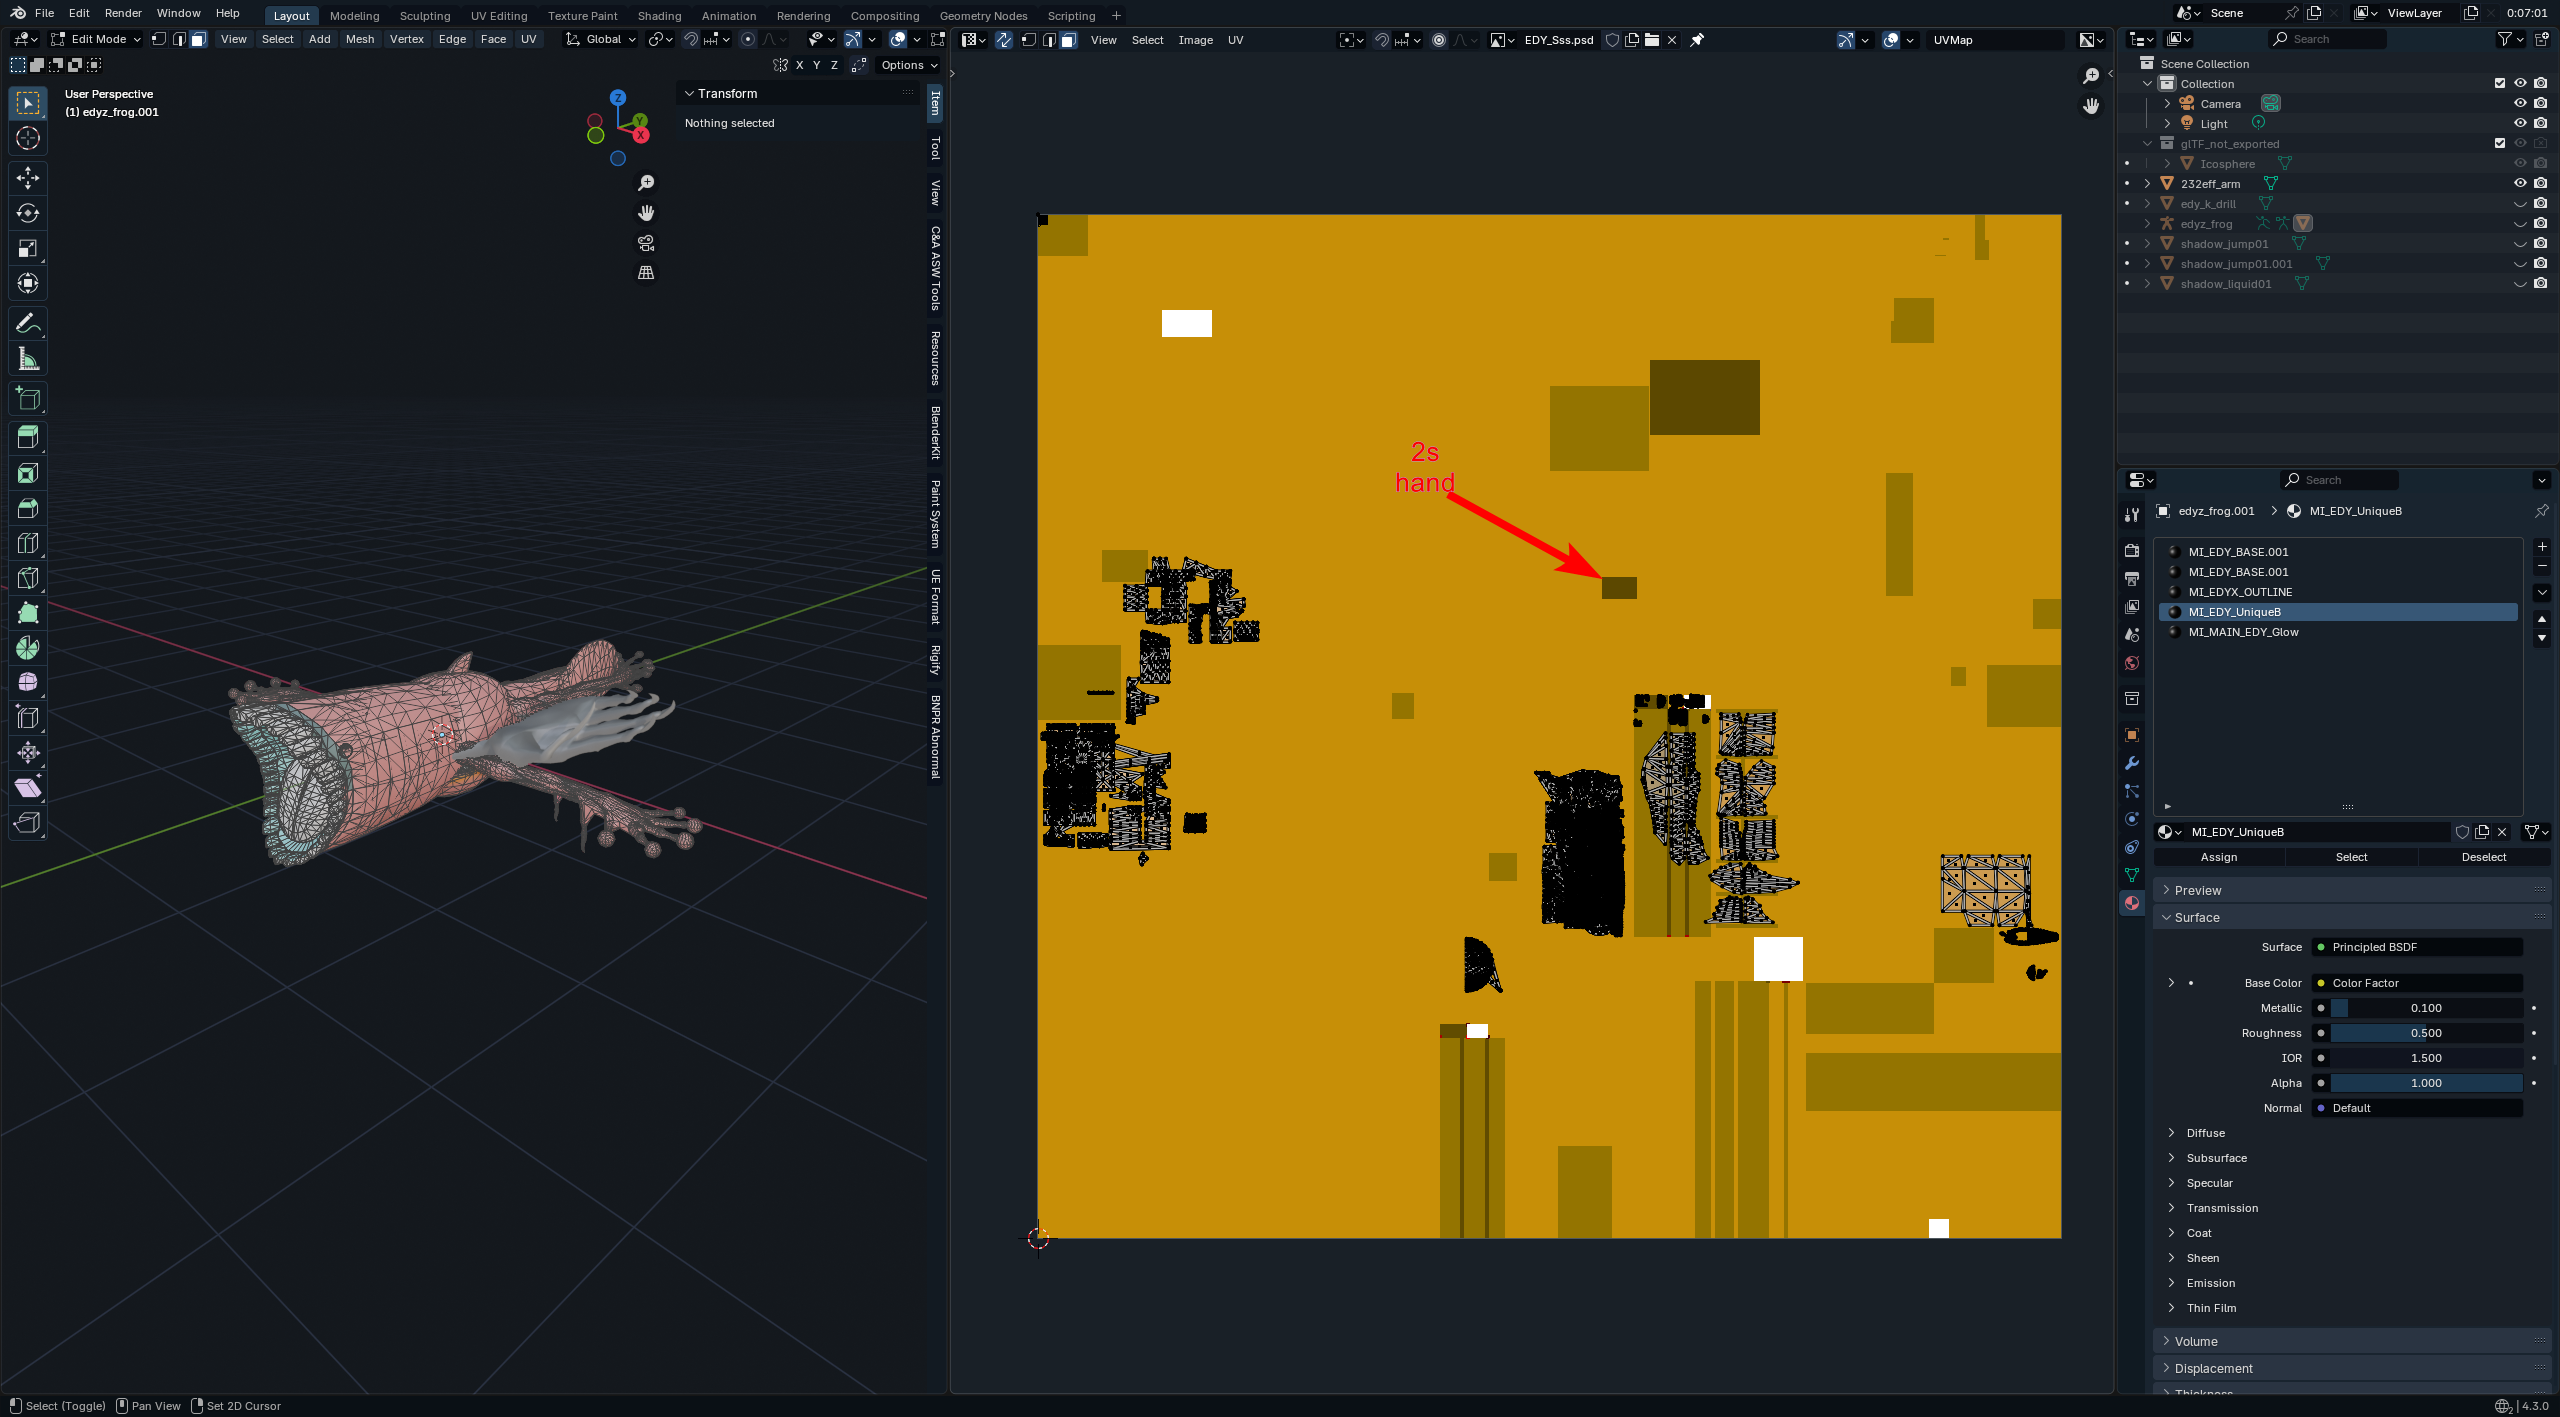
okay notes to self package the charamatetrial/edy folder package M_Glow
SO! here's my (hopefully) new-and-improved way to make Zato recolors that include Eddie, with only a little particle finagling
I've essentially reduced the previous process of guess-and-checking and editing UAsset files directly to editing materials in UE4 normally (though particle colors still have to be edited)
So;
The below zip contains the files needed to edit Eddie in Unreal. Note that it comes with some that should NOT be cooked; please follow the cooking section on this page to set up your cooking directories so that you only cook your Color01 folder.
Copy them over to your Unreal by placing the zip's contents in your project folder; Content merging with Content. (If it's not working, you probably need the CharaMaterial folder.)
the aformentioned zip
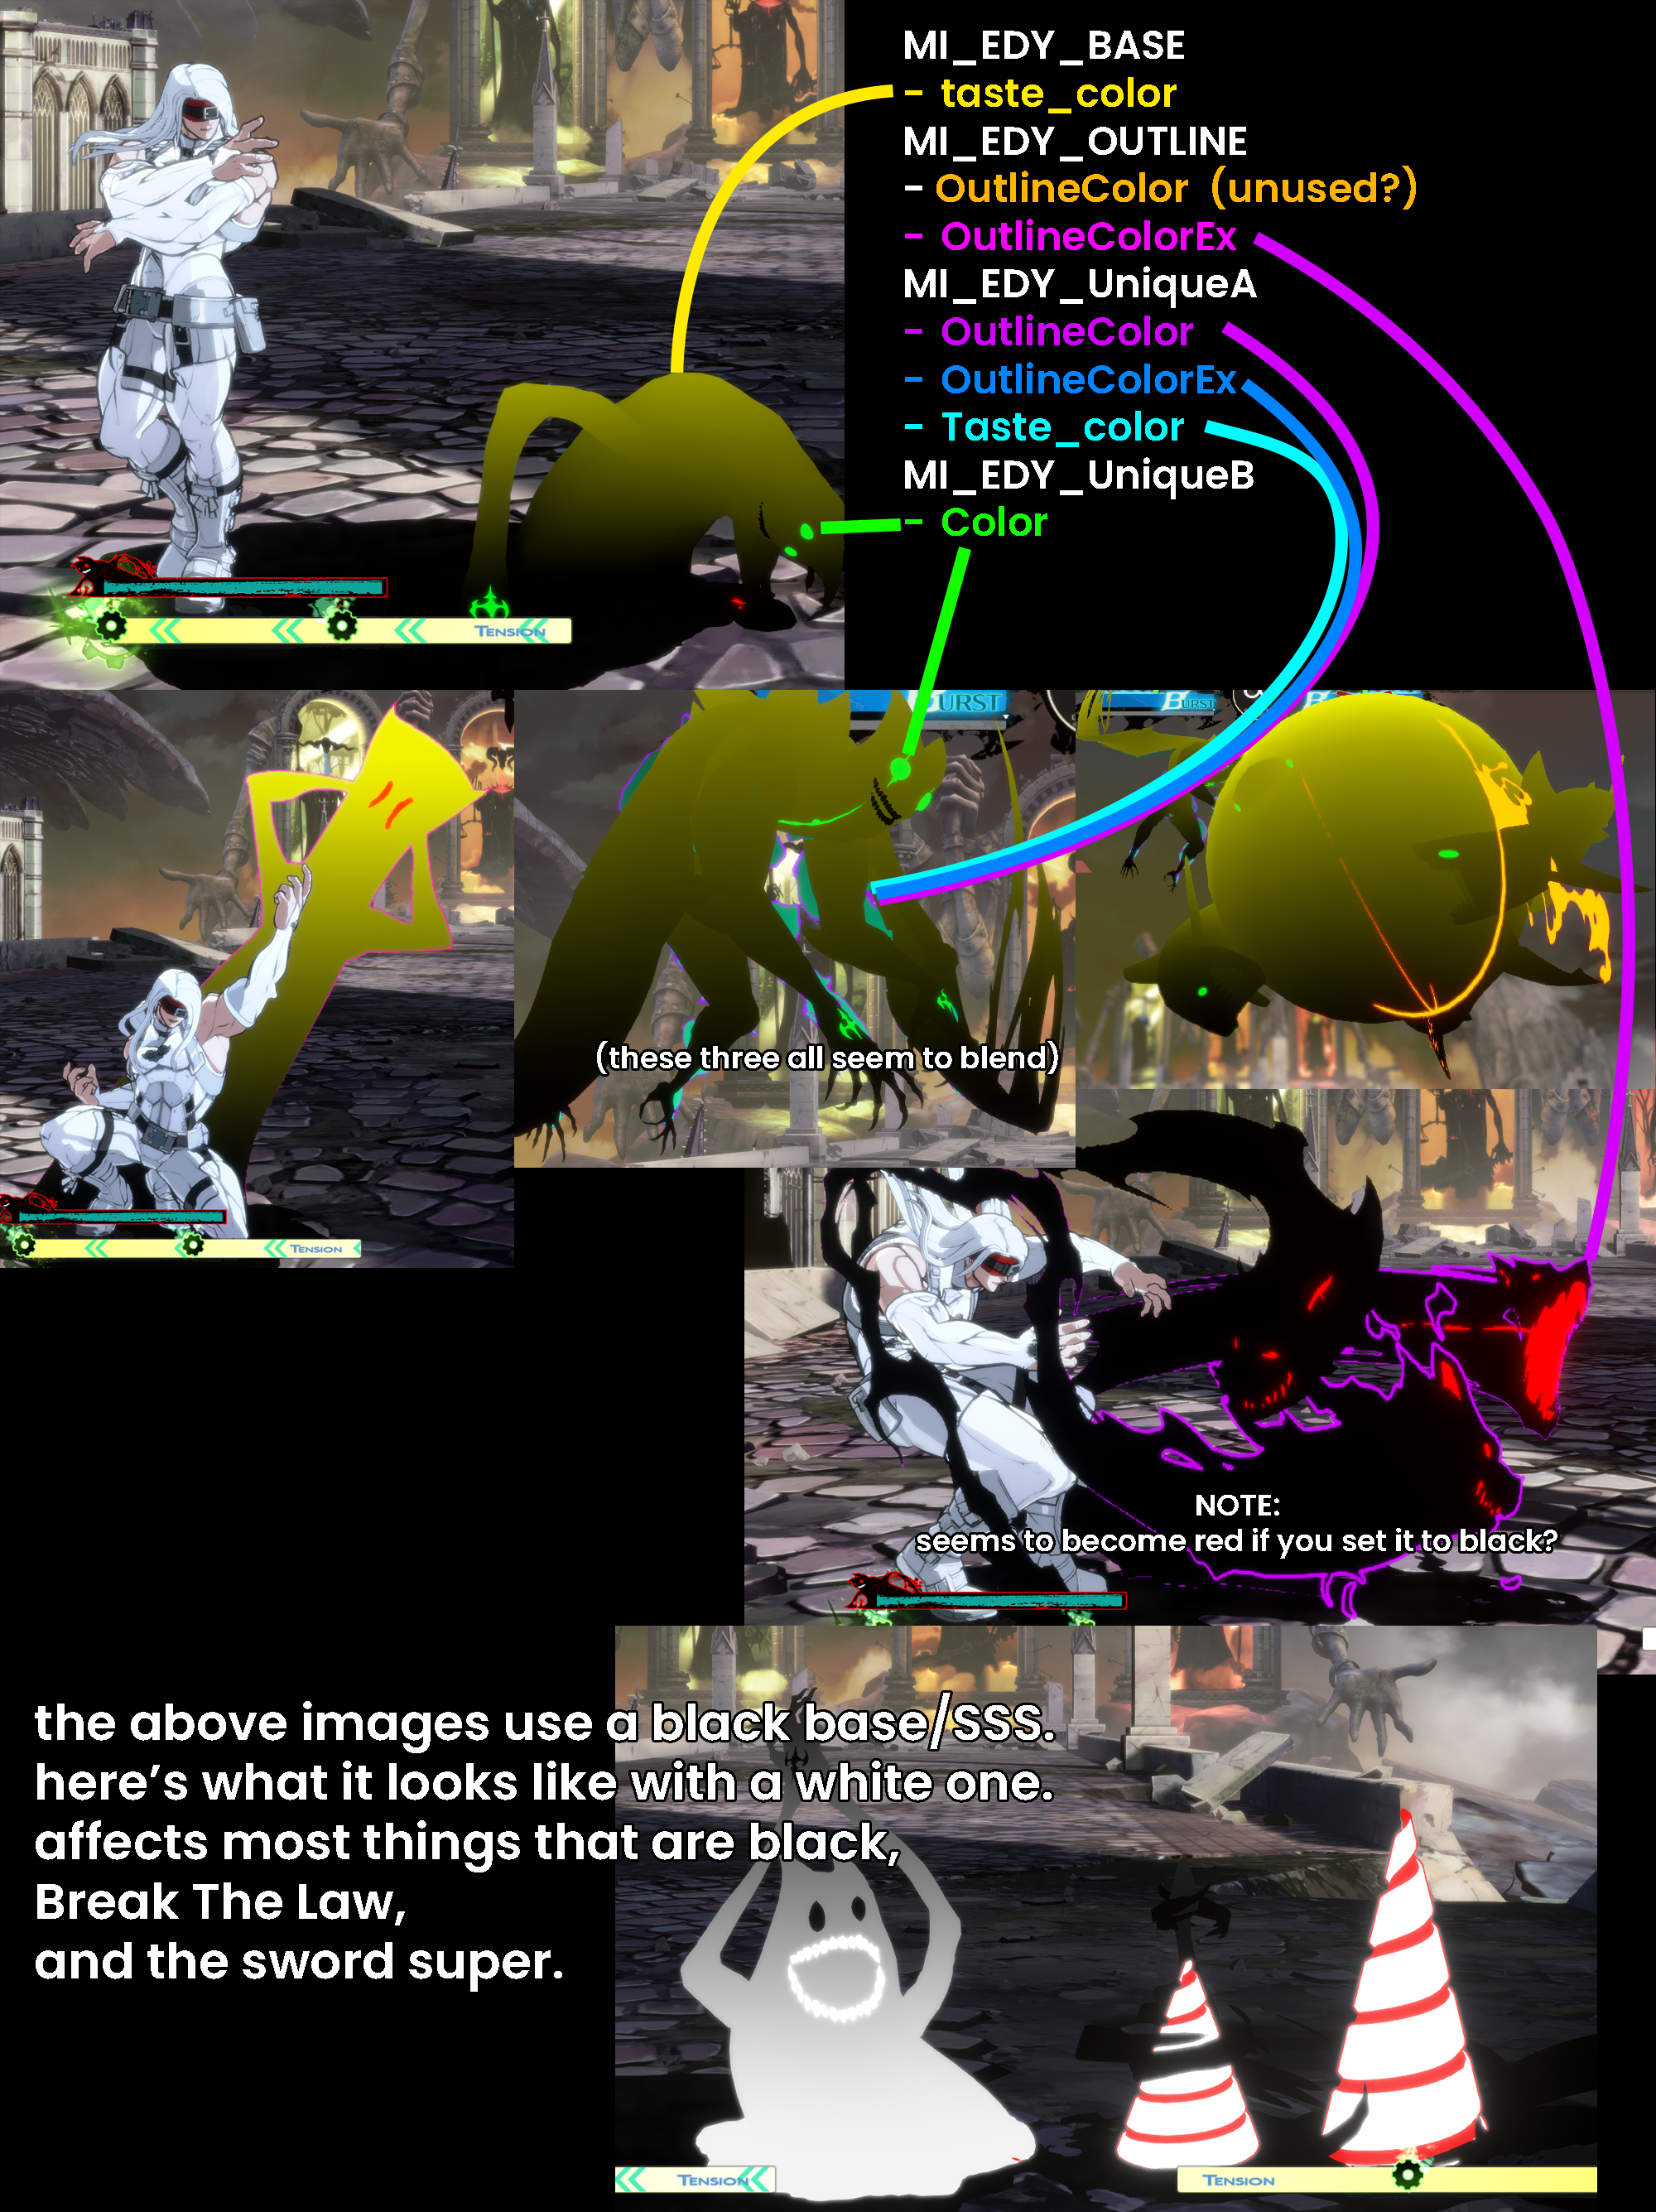
Here's a writeup from Noah in the UAM discord as to parts of Zato's materials/PTC; some parts of it are wrong, but I've put it here for posterity.
dropdown snippet
MI_EDY_BASE
Taste_color: Main Eddie color
OutlineColor - Probably invisible as a fade-to
MI_EDY_OUTLINE
OutlineColor - Probably invisible as a fade-to
OutlineColorEx - Primary outline color
MI_EDY_UNIQUE_A
Taste_Color - Executor spine and eyes
OutlineColor - Mirage effect on Zato outline on things like flight
OutlinecolorEx - Mirage effect on Zato outline on things like flight
MI_EDY_UNIQUE_B
Color - Markings on Eddie, some Eddie eyes
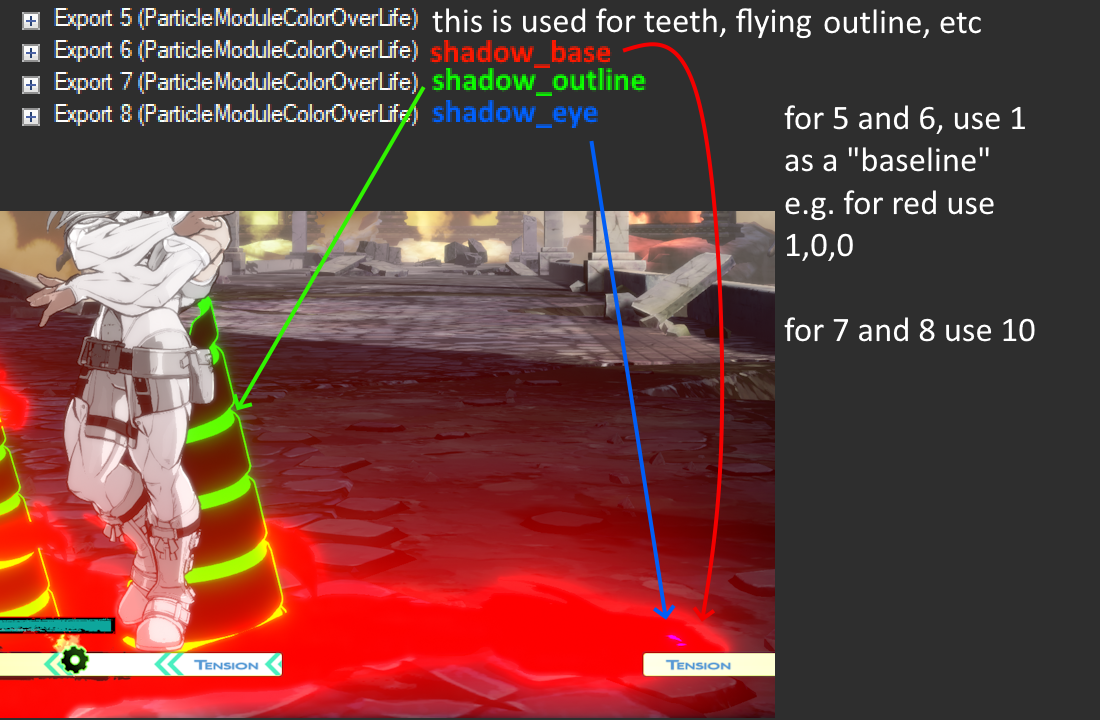
PTCColorAndMaterial
0 - Probably invisible as a fade-to
10 - Puddle
11 - Executor outline, some transitions from Eddie to Zato like landing animation
12 - Dark Eddie details like mouth and the shadow's eyes on 2H / attached normals
EDY_BASE
Texture file - Mesh texture for things like Drunkard Shade's mouth interior, j.S and j.D mouth, BTL. Important to keep as just flat colors.
NOTES 2P and 5P are governed by MI_EDY_BASE. 2S is PTC 10 [THIS IS WRONG!]
I would recommend using Blender to load the particle meshes (ZAT\Common\Effect\Particles\ZAT_PTC01\Mesh\) if you need to recolor something specific! View the UV maps!!!
Also loose file loading with the Costume mod really helped I recommend it for prototyping!!!
Here's what each part does;
EDY_SSS defines most of Eddie's "model" colors; e.g. Zato's dash surfboard.
Each particle (viewed in UAssetGUI as it can edit all values. ParticleEditor can only do some) is shown below.
The colors on these combine strangely, so use with caution.
all 3 are set to 10; Base seems like it should be set to 1.
DROPDOWN - Various miscellaneous pieces of info
Here's what each of Zato's animations look like with the SSS set to a rainbow gradient, like so (all of Zato's particle/mat colors are set to gold and white, for a recolor):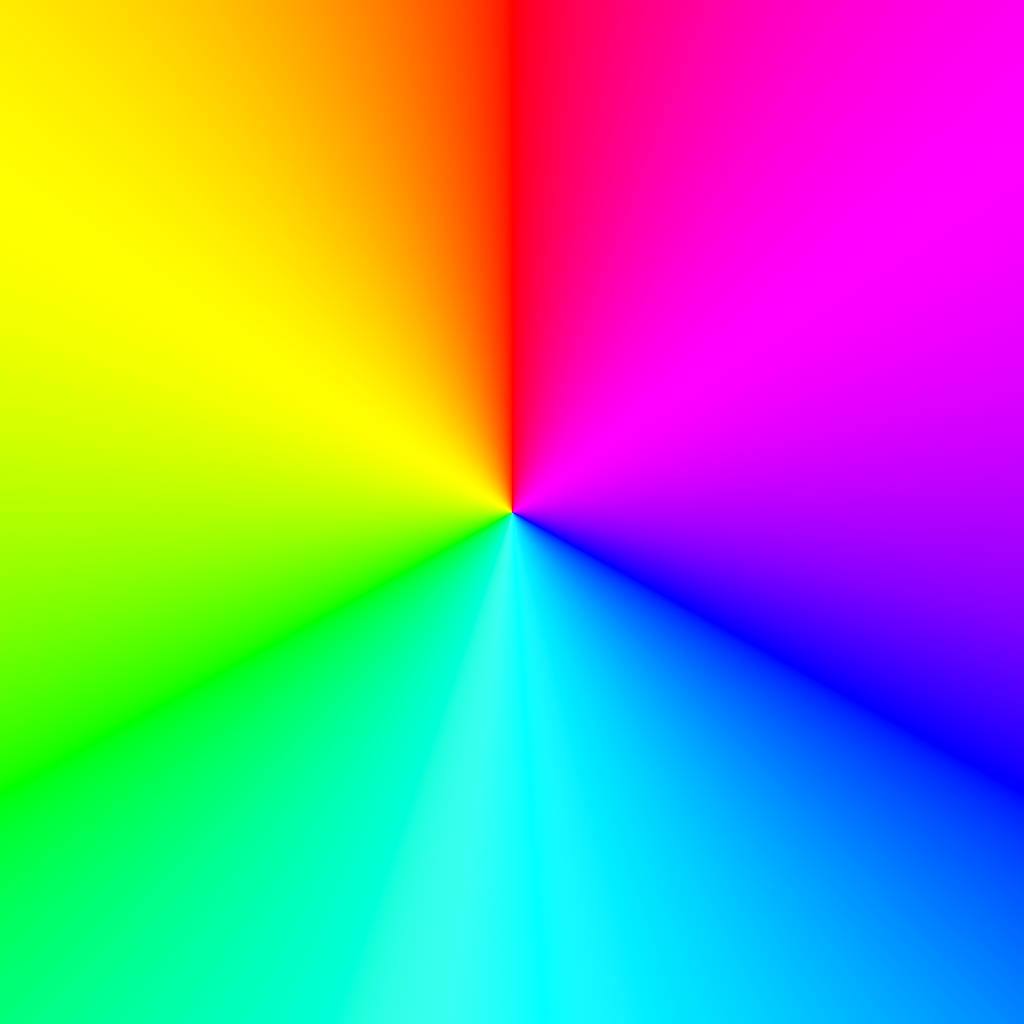
Here's the frog's mouth and the 2s hand since they were driving me insane;
Preview in Blender
This section is under construction, and was written by @bafrag & @muuyo
In this section, we'll overview how to preview your models with edited textures in Blender.
First, I recommend using this this template to have everything laid out already; materials and such come with. This is for Blender 4.2, so may not work on other versions. You can hit N when using the Blender Open dialog to disable the "Load UI" checkbox to keep the one already loaded. You can also add it as a startup file by putting it here; it'll be available on startup (the folder name just changes the Template name).
 ;
;
If loading this template is undesirable, you can instead Append the object "Sphere Of Materials" and all will be added to your project.
Finally, you can use C&A ASW Tools to hasten this process considerably; just load the addon, use it as described in the doc there, and it'll handle all of this MUCH more easily. If you instead wish to do it manually, see ahead.
To preview textures on a mesh, first import the models into Blender as written in section 9. Afterwards;
-
Set Viewport settings to Material Preview, circles at the top right.
-
If you want to use those models only for recolours you can delete their Armature if you wish, because you won't need to export the model. Choose the armature and either press Delete.

-
If the materials on your model are showing up as dummy_material, please use Fmodel, and export as UEmodel.
-
Open the Shader Editor tab below instead of the Timeline. Choose the slot with the Base material (usually named either "- Strive -...", "MI_MAIN_BASE", or CHR_base (CHR being the character ID)). Here, you input each texture into the shader.
-
Go to Base. Click on the folder icon and select your _base.TGA. Select it to put it into each node. Do the same thing with the other textures, such as SSS/Detail.
-
For the ILM, go into your character's
Material\Base\folder and input the texture. You will most likely have to change the Color Space on it from RGBa to Linear (or Linear Rec.709 on more recent versions of Blender) -
You should now see a proper looking model in Render, minus some bits.
-
Do the same with the "Decal/Damage" material, putting it over the MI_MAIN_DECAL material on the mesh (and renaming it as such) then inputting the XXX_Decal into the shader panel. This also requires Linear (or in more recent Blender versions, Linear Rec.709)
Audio
this section was written by @muuyo
So! Audio.
There are two processes for this; the first I'd recommend for the majority of situations, however if you're handling audio from a bunch of different places in your game, then you may wish to do the second.
Firstly;
-
Audio locations:
Audio type File location Character audio Content/Chara/XXX/Common/Audio/(SE/Voice)"Universal" battle sound effects Content/Chara/*CMN*/Common/Audio/SEBackground music Content/Audio/BGM -
This google sheet may be helpful for figuring out which file is which; each sound file usually has an animation ID in its name, that would correspond to these.
Handling audio natively within Fmodel
Fmodel has innate support for Unreal's audio files, and you can preview and export them without using previously required conversion tools. However, this requires a quick settings change.
Open Fmodel, and go into your Settings. Then, hit "Options" under Versioning Configuration, and input the below text:
{
  "SoundWave.UseAudioStreaming": false
}
Visual below;
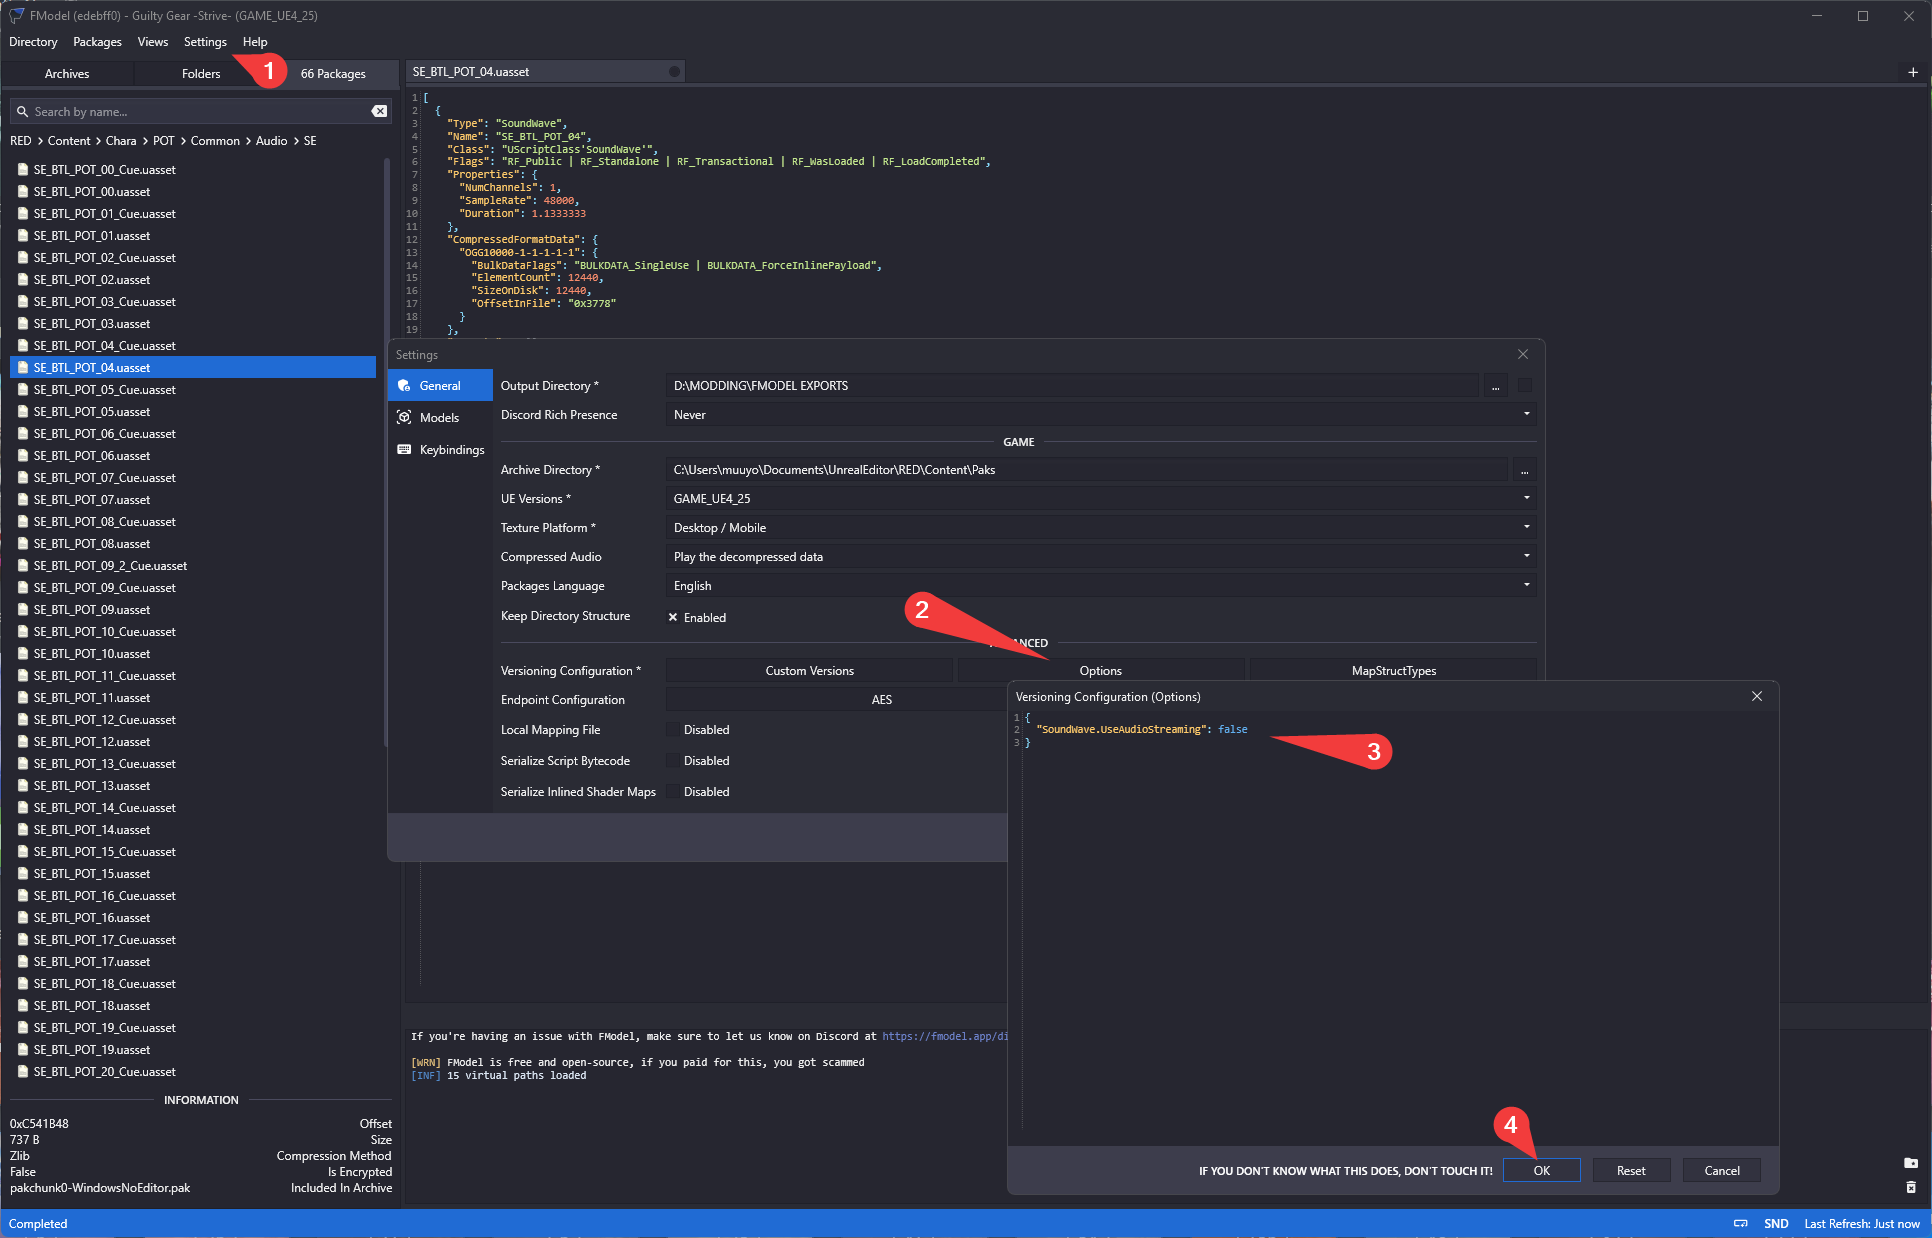
Now, you should be able to open any audio file within the game files, and double click to play (note that Cue files don't count).
To export, within this new Audio Player window, simply right click the file on the left (e.g. SE_BTL_XXX_01.ogg) and hit Save; it'll be exported to your Fmodel export directory.
To save multiple at once, shift+left-click all the files in the Packages panel (of the main Fmodel window) that you want to export to select them all, then right-click and Save Playlist in the Audio Player window.
(To clear the audio window, just close it.)
If you're looking to mass export audio files, beyond one character's voice lines in one language or something, I recommend using the below instead.
Mass file conversion using VC.exe
Long story short, the process essentially goes "save uassets using fmodel -> convert them to audio using the batch -> done"
So;
- Install Fmodel using its guide
- Browse to where the assets you want are
- right click the folder with all the assets you want to save (each asset is a sound file, usually easiest to do the whole language folder)
- Export Folder Package's Raw Data (uasset)
- Drop this zip file's contents into wherever you extracted them (click the underlined text at the bottom to navigate there)
- The contents of this zip do a few things:
- ExtractAudio loops through all folders inside the current folder, and converts assets to .oggs (putting them in the same place)
- deluasset and deluexp delete all of their respective files after you're done; just clears up clutter.
- Now, simply run "ExtractAudio" and all the files get converted.
Modding new audio into the game
Adding audio as a mod is pretty simple; put a wav file in the matching place in your Unreal project, then cook as normal. Volume and pitch can be changed within Unreal, as well, under file properties.
Texture introduction
This section was written by @muuyo
This is the basic layer of all modding in Arcsys games - recolors! You may wish to expand to mesh modding later, but this is usually what people go to first - and so will be a bit more comprehensive.
First, the basic overview;
-
Extract the game assets to somewhere on your computer using Fmodel; I usually just export all textures from my desired character's
Content/Chara/CHR/Costume01/Materialfolder. This should be in TGA; you need information saved in the alpha channel. In Fmodel, you can set the export format to TGA under Settings. -
Open the textures for your color slot in Photoshop or Photopea (you almost always need separate alpha editing support)
- These will usually be in:
- Content
- Chara
- Character ID (e.g. SOL)
- Costume01
- Material
- Base
- CHR_ILM, which is used for material properties - reflectiveness, drawn-on outlines, etc
- CHR_detail, which is used for little scrapes or folds drawn onto the character
- ColorXX
- CHR_base, which is the main color
- CHR_Sss, which is the texture used for shadows - the game has no builtin "shadows" beyond this image
- CHR_Decal, which is used for "transparent" overlays onto the mesh that require transparency, per-color variance or color
- An assortment of other textures; CHRW_Base is the base for the Weapon, others are usually self explanatory.
- Base
- Material
- Costume01
- Character ID (e.g. SOL)
- Chara
- Content
- These will usually be in:
-
Now that you have your character's textures in Photoshop, you can begin editing them. I would recommend viewing the section for previewing textures in Blender. As well, you may want to view the images page for a more detailed view on the operations of each texture.
-
Once you have your textures edited to a desired goal, you can export them as PSD or TGA with 32-bit color and Compression On for the latter. Take care as to the alpha layers, in the images section.
-
Then, simply pack them for Strive (or other Arcsys games) by following the Exporting section.
Functions of each texture
This section was written by @muuyo
This page will detail the functions of each image in Strive:
here's a visualized version of this, i'll make gifs and fancy stuff later
preliminary draft;
In this doc, when referring to values such as ".3", this usually means "30% white, mostly black" for instance. Different photo editors handle 30%/.3 differently.
As well, importantly, the "alpha" I refer to is the Alpha Channel of the image; USUALLY used for transparency, which is why files look broken sometimes.
This is why you have to:
- Use Photopea or Photoshop, Photopea being a free web-based clone of the latter. Both will do anything you need to do.
- Export textures as TGA specifically, because it stores alpha channel information non-destructively; ergo, if you use anything else, things are going to break pretty bad.
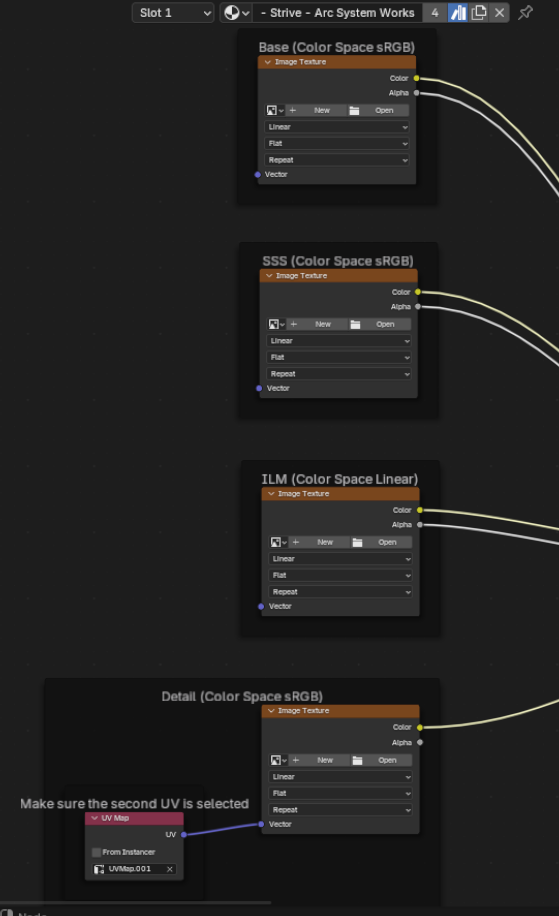
ColorXX (editable per color slot)
- CHR_base is the base color of your character. the alpha of this image decides how shiny the material is.
- CHR_Sss is the shadow color of your character - this game has no shadow lighting handling (mostly). The Alpha of this image defines Taste and Asano gradients, more specifically which parts of the image get them.
- Set this to .3 on a part to get the Asano gradient (usually used for hair).
- Set this to .7 on a part to get the Taste color
- These gradients are both set in the material, not any textures, so you almost always want this alpha completely black unless you are material instancing.
- CHR_decal is used for parts of the model that want a "transparent" texture to overlay onto the base. Very commonly used for small bits of text on models. Grey means transparent; anything lighter or darker becomes opaque.
- CHR_olm is only on some characters, and essentially defines how much of the SSS "bleeds" into the outline.
- Completely black means black outlines. As you get brighter, the outline starts reflecting the color of the SSS. I believe full white on this actually glows.
Base (only available per color slot using material instances)
- CHR_Detail is used for small lines, scrapes, folds, etc drawn onto the character. This is overlaid onto Base, whereas CHR_decal are seperate tiny bits of the model.
- CHR_ILM is a complicated texture; view the above doc for better info.
- Basically, this texture should be edited in Photoshop channels mode. Each channel of this image (R,G,B,A) does different things entirely.
- Red stores how bright highlights are - e.g. how bright the shiny part of shiny materials is.
- Green defines when something becomes shaded.
- < 0.1 on this makes something permanently very dark.
- < 0.25 on this makes something permanently shaded.
- 0.5 on this is the baseline, and is usually what you want.
- 1 on this makes something permanently unshaded.
- Blue is how powerful that part is highlighted. Keep this 0.5, but you can go darker or brighter to apply more "highlight" (e.g. parts become brighter) to random bits. (Better visual in above doc)
- Alpha (edit this separately if you choose to) manually draws outlines onto the model at that spot no matter what; this is different from Detail in that OLM is applied, and this works entirely like normal outlines.
- Basically, this texture should be edited in Photoshop channels mode. Each channel of this image (R,G,B,A) does different things entirely.
Custom materials
this section was written by @muuyo
A more comprehensive guide lies here, however it recommends Lean's materials - do not use its M_CharaBase, use the one included with your custom editor!
Also, turn Share Material Shader Code off in Project Settings!
Material instancing
Here's a small, easy place to start.
Materials in these games are very powerful. In Strive, even being able to edit the values that Arcsys program into them lets you do pretty interesting things;
add gradients to your characters, make things glow, make recolors work on Color13+, and even use the special filter that Color16 skins have.
Setting this up may be initially a little confusing. However, once you get it down, they're intuitive, easy to work with and preview (e.g. you can preview the recolor you're doing without ever booting Strive), and are a good branching point to custom materials (a much more technical process, however an incredibly powerful one)
So! To start, you'll need to instance
TODO
When written, this'll be a permanently-in-progress doc on how to make custom materials (including working with the M_CharaBase from Ryn's material recreations, which should come with your custom editor). As materials are a pretty wide and well-documented field, I won't attempt to go over anything comprehensively, especially considering that materials work nearly exactly the same here as they do in normal Unreal.
In brief, though, materials in Unreal are basically math with colors, and UVs define where those colors go. That's it. Place down a texture and it by default uses the UV from your model, but there's many more UVs you can feed into this - you will likely be looking for "ScreenPosition", which means the texture is essentially just static on screen as the model moves around. If you were to, for example, feed that into a Panner node, you can now make a scrolling texture.
Mesh/Model
This section is under construction, and was written by @muuyo
This section is reserved for all mesh mods - anything affecting the actual model of the character. Before embarking on this kind of project, I would recommend having at least minimal experience in Blender. It's perfectly possible to dive in head-first, however I've found many struggle to get a good product out without first knowing the interface. If you're instead either bold or foolhardy like I was, read on.
You will need:
- The custom Unreal Engine from section 1
- A copy of Blender (or other modeling software, however Blender is much more widely used among the modding community and so you'll likely find better support for it)
- A copy of UnrealPak from the pak section
I recommend also using the Blender shader to accurately preview what you're doing from this youtube playlist.
Extracting your mesh
This section is under construction, and was written by @muuyo
You're looking to use either Fmodel, or Umodel. Learn how to set each up at the links above. Umodel is a more antiquated piece of software; Fmodel is more recent, and I personally prefer using it. As well, it seems to currently be the only software that supports exporting material names, animations and every other asset! Umodel is mostly here for posterity.
Either way, mesh locations you'll want to look for:
- Character meshes are stored in a tree like
RED\Chara\ANJ\Costume01\Mesh - Character meshes used for moves are stored in places like
RED\Chara\ANJ\Common\Effect\Particles\ANJ_PTC01\Mesh. This is much more trial and error, however most are named after their animation IDs, linked here. Warning, these are shared across every color on that character, just like normal mesh mods. - Map meshes are stored in
RED\Map\Battle\under their internal name - an index is linked here.. This is slightly outdated, but you should be able to figure it out.
Fmodel
Set up Fmodel using the tutorial here.
This is a newer method, however most likely much less of a pain to use, and more foolproof.
- Follow the steps on the Fmodel page to download and configure Fmodel and the Blender addon to accept .ueformat files
- Optionally, double click any file to preview it in Fmodel's viewer
- Right click any file in Fmodel, and export as a ueformat file as in the page linked in Step 1
Umodel
Set up Umodel using the tutorial here.
- now, browse through the game's file trees to find whatever you wish to extract, then either right click the folder on the left and press Export folder content. You want GLTF.
- or, right click an individual file and do so. For more detailed overhaul-y mesh mods, I recommend exporting animations at this step as well, explained in section 7, as having them in Blender will mean you don't have to extract the mesh again later - they're very useful for finding when and how your model will jank out.
After either method, view the mesh importing section.
Getting your mesh into Blender
This section is under construction, and was written by @bafrag & @muuyo
Some actions must be done in Blender before importing the model here:
- Set Unit scale to 0.01
Fmodel
If using UEFormat from Fmodel, please note that you will need the Blender addon to import those files, linked in this section.
- Set up Fmodel as described here.
- Set Fmodel to export as uemodel, under Settings.
- Open GGST in the Package tree (under pakchunk01, usually) then navigate to any model in the model tree (e.x.
RED>Content>Chara>ANJ>Costume01>Mesh) - Right click any mesh and hit "save model".
- Click the file when it exports in the console log at the bottom (white underlined link) to navigate to it.
- Copy the directory from Explorer's link bar to Blender's "File -> Import -> .uemodel" import dialog.
- Change the Fmodel settings to what you need - I currently have "Scale" at 1.00 and "Bone Length" at 4.
- Donezo. Many materials will be chunked (the model having multiple Blender material slots that are in fact the same original material), though, so it's recommended that you go into Mesh Edit mode and do this process;
- for every material with the same name, use Select to select all vertices on that material
- Assign them to the first slot of that material (merge ANJ_BASE with ANJ_BASE)
- The above doesn't apply to material slots like
ELP_base_skirtandMI_MAIN_BASE_frip; these are still unique, and shouldn't be merged with normal Base materials. - do this for each other chunked material
- go into Object mode and delete the other slots (the ones you just removed all parts of the mesh from) with the - button.
- Alternatively, install the Material Utilities addon to handle this process automatically.
- To do so, install the above addon then use it to clean material slots (since there's duplicates) then remove the extras manually using the Minus on the right (doesn't work in edit mode).

- To do so, install the above addon then use it to clean material slots (since there's duplicates) then remove the extras manually using the Minus on the right (doesn't work in edit mode).
Umodel
- Download the ASW-compatible modded .gltf importer addon
- Add the addons to Blender in Edit > Preferences > Add-ons > dropdown at the top right > Install from file
- You may have to disable the Blender gltf addon first, then enable the Unreal-compatible one you just downloaded.
- Import the model;
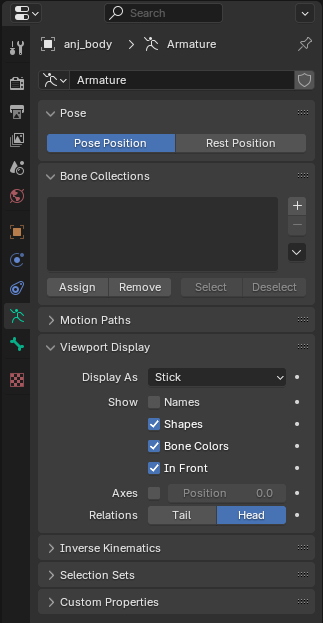
- Delete Icospheres, or set the Viewport Display under Armature on your armature (green skeleton in Details) to Octahedral/Stick, depending on preference. You can completely hide it as well.
- Rename Armature to "Armature"
Now you can go on to use this baseline, or get materials onto your model.
Get your model outlines
This section is under construction, and was written by @muuyo
okay so
quick rundown no editor speak for this one
you got two options to make outlines work:- set up tangents on your model, do a bunch of work, re-do it every export, but a bit better results (allegedly)
- don't do that, get pretty much the same results (AFAIK)
but to do either of those you need to do vertex colors first so
VERTEX COLORS
remember, use blender 4.2, it's the only thing compatible with every tool you need
- get Vertex Color Master from here
- install it into blender
- if your model doesn't have a Color attribute (properties at bottom right, then hit the little green triangle, then hit Color Attributes; you should see this:)

- if you don't, click the little plus and add one with those settings
- cool. now select your model, change to Vertex Paint mode, hit the little VCM on the right
- change "Active Channels" to just A (to make Alpha the one you're editing; rundown of what each does here)
- Isolate Active Channel
- change Brush Settings to 0.73, hit Fill With Value, then Apply Changes
okay, that's done now to
THE UNREAL HALF
you have two options: tangents or normals
tangents normals easier to set up on the Unreal end you have to set up One thing in unreal requires re-doing every export don't have to do anything in blender doesn't work with models that have non-triangular faces, should be able to change export setting works with anything, afaik theoretically more accurate (and controllable) results one-and-done the better option, actually in the mesh bandaid fix, won't work with different MI_MAIN_OUTLINEs on some recolors, more fickle
for tangents, go to the tangent section
for normal based outlines:
- you'll be using a copy of MI_MAIN_OUTLINE
- copy it from the advanced project's Shared/CharaMaterial folder to anywhere (use the updated ver, from here!), I usually just put it under
XXX/Costume01/Material/Base/then I rename it to something specific to my mod. - right click, Create Material Instance, rename it to MI_MAIN_OUTLINE
- open that material instance, and change the setting UseTangents to off. note, the first checkbox changes whether you're changing that value, the second changes the actual value. like this:

- set up the other stuff too. i don't think you need to set up olm and SSS? just know those settings are there if it doesn't work / you're doing recolors / etc. this material is also how cool custom outlines are done, like red ones.
- you should be done. apologies, haven't tested, this is a quick writeup. should work though. just make sure the file is named correctly, MI_MAIN_OUTLINE.
Setting up tangent-based outlines
This section is under construction, and was written by @muuyo
Due to the use of the newer advanced project, the switch to a different outline generation method different than the one most modders are used to is necessary. The difference is pretty minimal, essentially requiring you to press one extra button before exporting to Blender. However, it might be a bit confusing at first, thus this guide exists.
As to the benefits, you can use Abnormal to manipulate the way the outline extrudes from faces (in case it janks out in places you don't want it to) and it is generally more accurate (less floating off the model).
You will require a copy of the plugin Abnormal and the improved FBX plugin here to do this. To install it, simply go to the link above, download the latest release, and add it as a blender addon in Preferences (Addons → top-right arrow → Install from File). Do the same for the FBX exporter, and disable Blender's built-in one.
You also need to be running Blender 4.2.
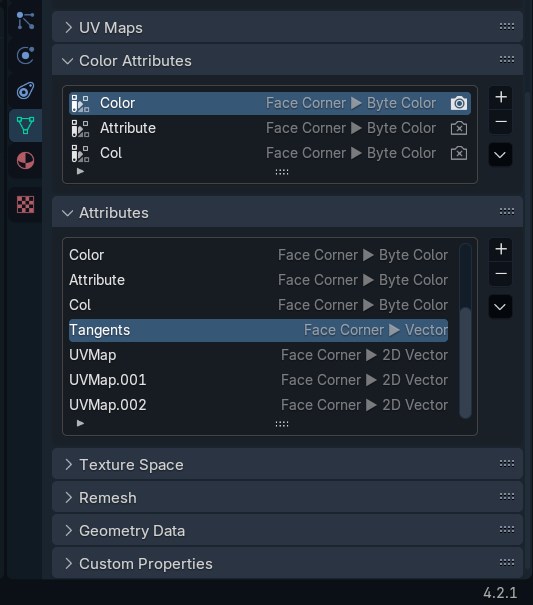
To begin:- Set up a model for exporting as usual
- Make sure it has an attribute with the name
Tangentsand the typeFace Corner -> Vector. To do this, go into the menu shown below. If there's already anything named Tangents that isn't that (or there are multiple), remove all of them using the - (in both the Color Attribute and Attribute tabs); then, hit the + in the Attributes section and put inTangentswith domain Face Corner and type Vector.
- You will see a button on the right side (or top) of your Blender 3D Viewport (if Abnormal is enabled) labeled "BNPR Abnormal". If there's no sidebar, hit N. Enter "BNPR Abnormal" with your model selected, select
Tangentsfor theFace Corner Attribute:field (with nothing selected in the Vertex Group), and finally hitNormals --> Face Corner Attribute.
You're done setting up the model itself! Note that you'll have to press
Normals --> Face Corner Attributeagain if any changes to the model are made (though if you're just testing, it's fine).Exporting
Now, to export:
- Open the Export as FBX menu and make sure it says "Export FBX (Arc System Works)" on the confirm button
- Put in these exact settings (the one that differs from standard exporting is "Tangent Space")
For ease of use, I recommend hitting the plus at the top right and adding a preset (named anything). You can select these presets on subsequent launches by using the dropdown. Afterwards, export to FBX as standard (using the filename that the game's model originally had)
Importing
To import into Unreal, the process is largely the same as before except with one different setting, as shown below.

Remember to set the Outline LOD indexes as usual.
Verifying this all worked
You should finally be done! It's a lot faster when doing it a second time. To verify everything worked, you'll have to make a very simple custom material. Follow the video below, and if both results look the same, it worked. If they don't, something messed up somewhere. Feel free to delete the material afterwards.
Getting files into UE4
So! This section is going to be a little long.
- Install Unreal using the pages in the "Installing Unreal" and "Starting The Editor" sections on the left sidebar.
- If you're making a new project (which I usually recommend, view on this page) to set it up to use an extra project under the Strive dropdown. This lets you handle your "own" files a lot better.
Textures
- Drag the textures into Unreal where they need to go, then double click them and set SRGB to Off under the "Texture" dropdown. This is required for most textures - but not UI ones, I believe, notably. If you're noticing your character being strangely darker or lighter, check these.
- You can select multiple files and
Right Click > Asset Actions > Bulk Edit Via Property Matrixto edit many at once. The right pane toggles settings on all files. - Proceed to the Cooking section.
Meshes
Okay, so;
- In Blender, make sure you have the FBX export addon (using blender 4.2). The full process is detailed on the Blender page, under the FBX section.
- Make sure you're going to handle Outlines using one of the methods in the Outlines page
- Export the file as you need. Make sure to check the Blender page above that you've got the correct export settings!
- Drag it into your character's Mesh folder. Use these specific settings, mostly all necessary:
- Proceed to the cooking section.
Cooking
You may want to know that I have scripts that automatically cook, copy, and pack the files all automatically! They're on the user-made tools page. Below config settings still apply.
To make sure you're only cooking the files you want, hit
Edit > Project Settings > (new panel appears) > Packaging.- Then, click the first dropdown under the Packaging section:
- Disable Share Material Shader Code if it's not already disabled.
- These two sections are of great interest:
- Additional Asset Directories To Cook specifies the specific directories... you want to cook. Point this to your files if you only want to cook those things; as well, it disables cooking any other files in the project if this is set.
- Directories To Never Cook is nice for disabling things. I recommend putting
/Game/Sharedin here no matter what, as it causes Big Problems if you accidentally cook it somehow.
Now, to actually cook.
Hit File at the top left, then hit Cook Content For Windows.
Wait for this to finish. If it pops up an error, you may have not set up your custom project correctly (or you may have to switch to one); view this section's dropdown for Strive here.
Now that these files are cooked:- You'll need UnrealPak;
- Copy the cooked files from your cooked folder (such as this, in your project folder:
ProjectName\Saved\Cooked\WindowsNoEditor\ProjectName) to a subfolder of your UnrealPak folder under RED (e.g.,UnrealPak\[AnyProjectNameYouWant]\RED\) - MAKE SURE you delete Skeletons and such for meshes unless you know what you're doing. You want to delete it in the cooking step, so make sure there are no
xxx_body_Skeleton.pak/uexpor anything similar. - Drag this [AnyProjectName] folder onto UnrealPak-With-Compression.bat, it'll create a file called [YourProjectName].pak
- This is your mod! Install it as with any other mod.
- Please note that you'll need a .sig file to go with your mod. For example, this'll look like
- Unverum/Mods/ OR Paks/~mods/
-- ModName
--- ModName.pak
--- ModName.sig
You can use any sig file from any other mod - all are identical. Copy it from anything you have.
Note: Sig file needs to have the exact same name as the Pak. They can both be named anything, but it has to be identical.
Your mod should now work!Custom materials
this section was written by @muuyo
A more comprehensive guide lies here, however it recommends Lean's materials - do not use its M_CharaBase, use the one included with your custom editor!
Also, turn Share Material Shader Code off in Project Settings!
Material instancing
Here's a small, easy place to start. Materials in these games are very powerful. In Strive, even being able to edit the values that Arcsys program into them lets you do pretty interesting things;
add gradients to your characters, make things glow, make recolors work on Color13+, and even use the special filter that Color16 skins have.
Setting this up may be initially a little confusing. However, once you get it down, they're intuitive, easy to work with and preview (e.g. you can preview the recolor you're doing without ever booting Strive), and are a good branching point to custom materials (a much more technical process, however an incredibly powerful one)So! To start, you'll need to instance
TODO
When written, this'll be a permanently-in-progress doc on how to make custom materials (including working with the M_CharaBase from Ryn's material recreations, which should come with your custom editor). As materials are a pretty wide and well-documented field, I won't attempt to go over anything comprehensively, especially considering that materials work nearly exactly the same here as they do in normal Unreal.In brief, though, materials in Unreal are basically math with colors, and UVs define where those colors go. That's it. Place down a texture and it by default uses the UV from your model, but there's many more UVs you can feed into this - you will likely be looking for "ScreenPosition", which means the texture is essentially just static on screen as the model moves around. If you were to, for example, feed that into a Panner node, you can now make a scrolling texture.
Animations
This section is under construction and was written by @bafrag
This section is all about animations. How to extract, edit and import in the game. To start you need those tools:
- The custom Unreal Engine from section 1
- A copy of Blender
- A copy of Unreal Pak from the pak section
- HeX editor (I suggest you to use 010 Editor)
- Fmodel from section 3
- AssetEditor from section 3
Extracting Animation from the Game
This section is under construction and was written by @bafrag
To extract animation from the game you'll need to use either Fmodel for animation or custom Umodel for animation. That version prevents models to have scale issues (ASW loves use them in every character animation)
Umodel
- After setting up Umodel go through game folders to character mesh file and open it.
- After that press "O" button.
- Then go to the animation folder Chara\ANJ\Costume01\Animation\Default\body (for example).
- Select all files, press "Open" -> "Append".
- By pressing brackets you can navigate through animations and by pressing Spacebar play them.
- Press either "Ctrl+X" or Export button to export .gltf file with animations.
Fmodel
- Idk, muuyo, pls fill this section
You also need to save as .uasset files the animation files. After extracting those files you can import them in Blender to edit them.
Import Animations in Blender
This section is under construction and was written by @bafrag
Before Importing
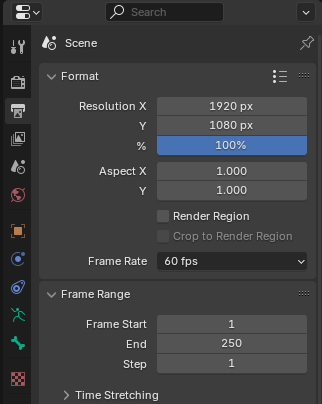
- Set Unit scale to 0.01

- Set Frame Rate to 60
Umodel
- If you extracted as .gltf files you need to import those.
- Set bones to Stick.
- Open Animation tab.
- Below change Dope Sheet to Action Editor.
- Select the Armature and then below animation you want to change.
- Press "T" and set Interpolation to Constant.
Fmodel
Same, Idk anything.
Editing Animation
This section is under construction and was written by @bafrag
Editing is actually easier than you can think.
- First, you need to acknowledge where the animation is used. Here is the list
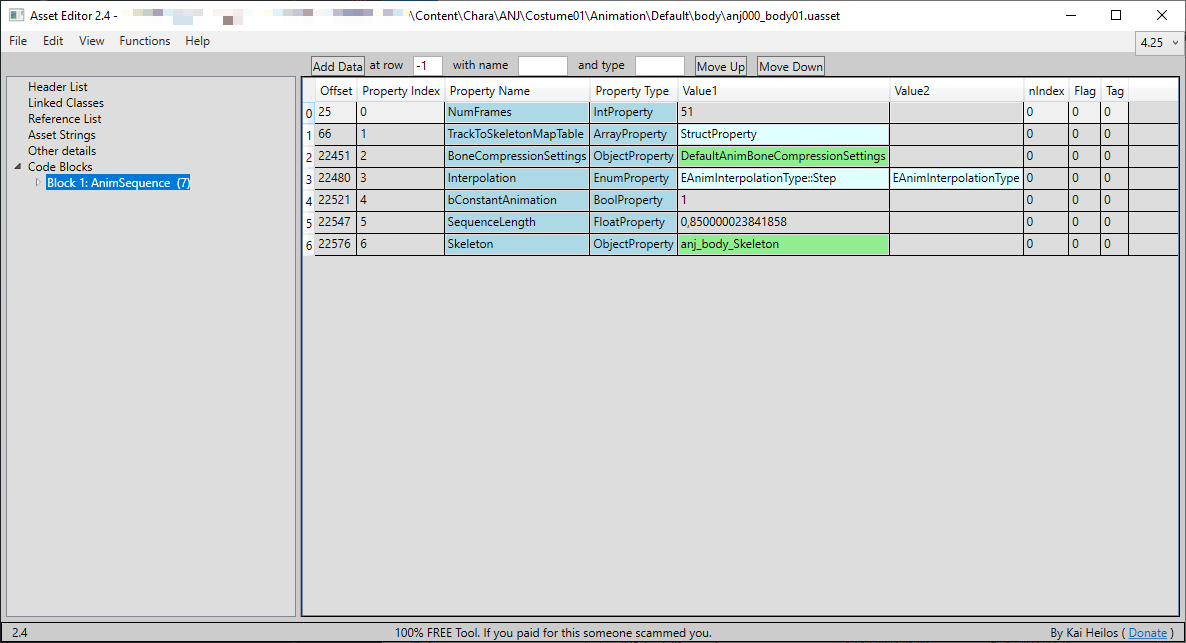
- Then you need to set right Frame Range. Open is Asset Editor the animation file, look at NumFrames line and subtract 1. In this case Frame range is from 0 to 50 frames.
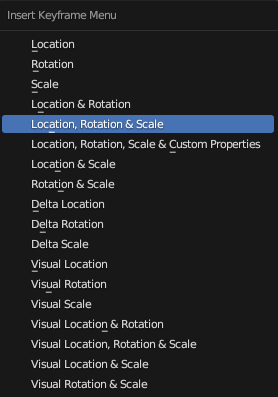
- To edit anything select the Armature and go to the Pose mode. Move/Rotate/Scale each bone as you want. Press "I" and choose "Location, Rotation & Scale" if you use Blender 3.6 version.
- After edit works in Graph editor search "scale", and move the values by y0.01
Export Animation in the Unreal Engine
This section is under construction and was written by @bafrag
Blender
- While holding Ctrl select first the model and then the Armature
- Export as FBX with these settings:
- The file name should match the .uasset file + add _mesh. anj000_body01_mesh in our case.
Unreal Engine
- Recreate the full folder path. "Chara\Costume01\Mesh", "Chara\Costume01\Animation\Default\body"
- Press Import and import the .fbx file with these settings:
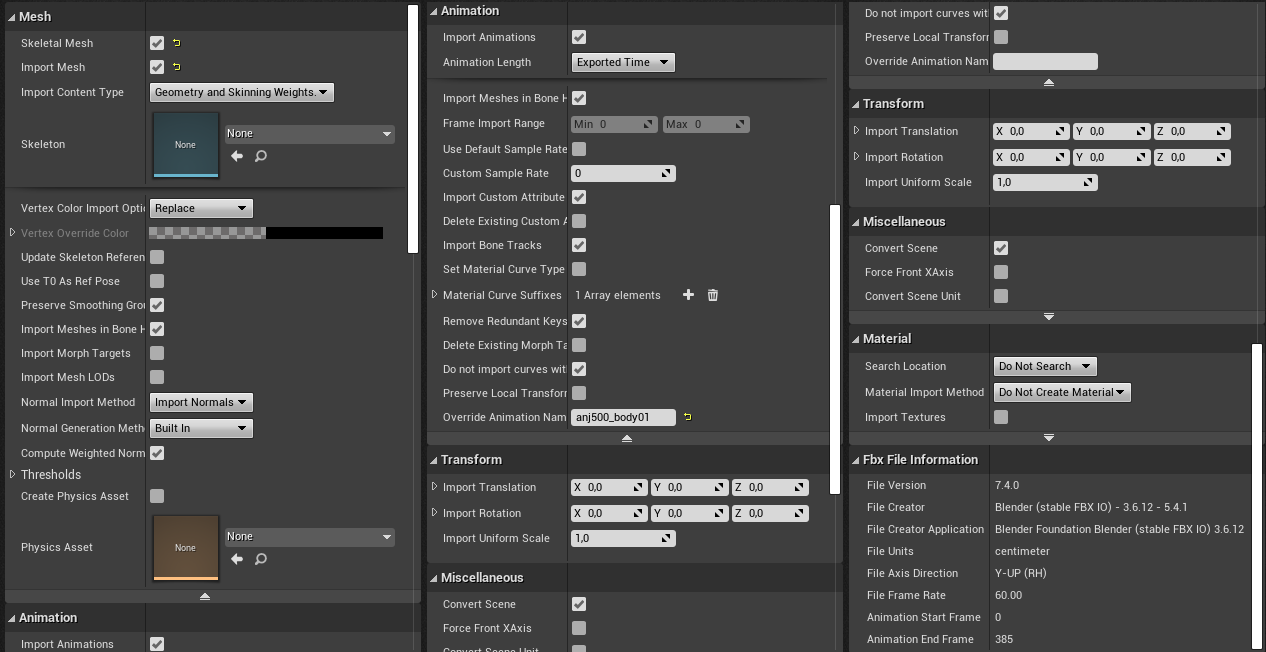
- After installing move the animation file to Chara\Costume01\Animation\Default\body folder and other to Mesh one.
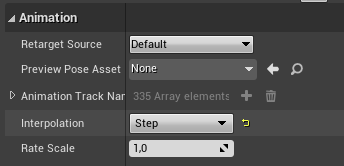
- Open Animation file and set Interpolation to Step
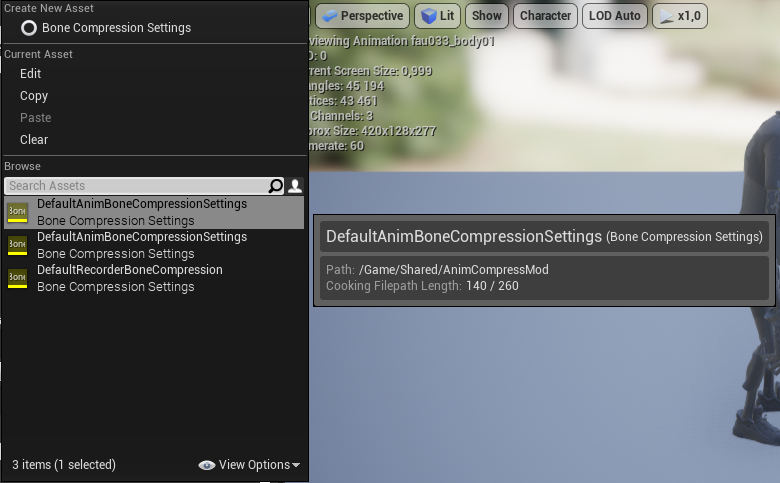
- Scroll down till you find Bone Compression Settings and copy it.
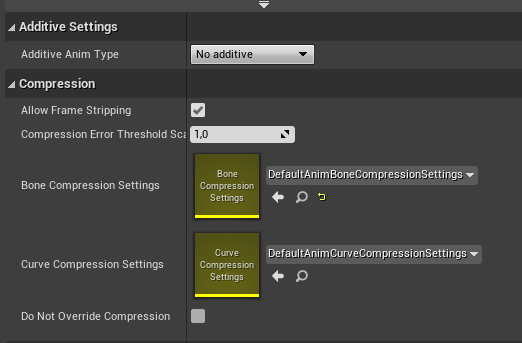
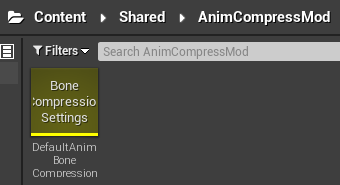
- Create the Shared\AnimCompressMod path and paste here copied Bone Compression Settings
- Open the animation file again and choose the Bone Compression Settings from Shared\AnimCompressMod folder
- Make sure that every file is named correctly, save all and cook for Windows.
HeX Editing animation
This section is under construction and was written by @bafrag
This is where the fun begins. Without this your mod will crush the game.
- Open your animation mod in Mod_Folder_Project\Saved\Cooked...\body in AssetEditor. Open the original animation file with the same name. You need to copy the Sequence Length number.
- The open both .uexp files in HeX editor. I will use 010 Editor because it will help with 1 step specially.
HeX Editor
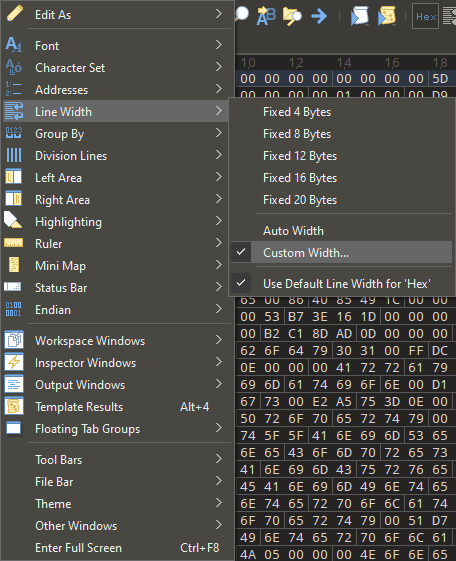
- Set custom Line Width to 37 bytes per row
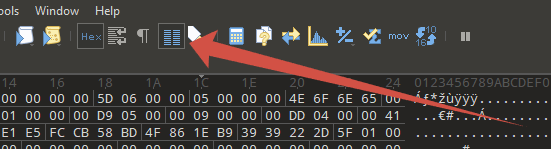
- Enable Column mode
- Then you need to select the 1D and 1E columns starting from the 00 above 01 to FF 00 values and copy that.
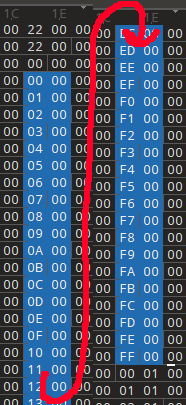
- Do the same thing with edited animation's file but paste the values from the OG file.
- After that, search 113 value. It should be in this are:
- Go up till you find the 00 00 00 00 row. This is your start position for massive copy-paste. But where is the end?
Fmodel
Open in the Fmodel OG animation file. There are many BoneTreeIndex lines. Those are the number of bytes you need to select. Pro tip: Copy-paste the whole file in text file, "Ctrl+F": BoneTreeIndex. And multiply the answer by 4.
  "BoneTreeIndex": 0
},
{
  "BoneTreeIndex": 1
},
{
  "BoneTreeIndex": 2
},
Continue HeX Editing
- Starting from 00 00 00 00 row select range with the value you have found in the Fmodel part and copy it. Don't forget to disable the Column mode.
- In the edited animation file select also starting from 00 00 00 00 and paste the values. If the new pasted values override the pasted column values, don't do this step.
Congratulation. Hex Edit works are done! Now you need to correct pak your mod.
Animations
This section is under construction and was written by @bafrag
Animations
This section is under construction and was written by @bafrag
Hurt & hitboxes
Particles
This section is under construction, and was written by @muuyo
Particles are a bit of a strange art; they're pretty easy to understand however editing them is usually a process of guess and check, so it can be a bit annoying if there's not an existing character reference on how to edit them.
First, a few things;
There are characters with per-color particles; these are found within a file called "ParticleData" in each ColorXX folder, and they make your life easy. You can use one of the programs listed in the editing page to edit these fine, and it's generally pretty easy to mess with them.If they're not per-color, they're character-wide. This has obvious downsides, however they're still perfectly editable. It just takes a lot more work. Not hard work per se, however you'll be doing a lot of sanity checking and trying out different solutions.
The general process of particle editing is a pretty different workflow from working on normal character files or anything.
First and foremost, you never actually cook particles. You instead modify files from the game directly, without ever passing them through anything but UnrealPak.- Firstly, save the asset for one of these files using Fmodel (preferred) or Umodel, elaborated upon in the tools section. Right click any particle file;
- for per-color character particles, first look in a character's ColorXX folder for a file titled "ParticleData" and right click to Save the raw asset.
- if they don't have one of these, you'll have to edit each and every particle individually. See the section below for that.
[Dropdown] Per-character particle hunting
This one's a doozy! Temporary summary;
These are found in the character'sCHR/Common/Effect/Particles/CHR_PTCXX/PTCfolder. You can save these as assets based on their name. They should be vaguely self explanatory, however you can compare it to the expected animation IDs which may help (although they may not even match up, or have IDs at all...)
If you need a more robust way to preview what they're doing rather than editing each file in a guess-and-check nightmare, you have two options;- Preview them in Unreal using the Advanced Project.
- When you're viewing the file, it'll be all black. To fix this, either
- View it in Wireframe mode using the toggle at the top left.
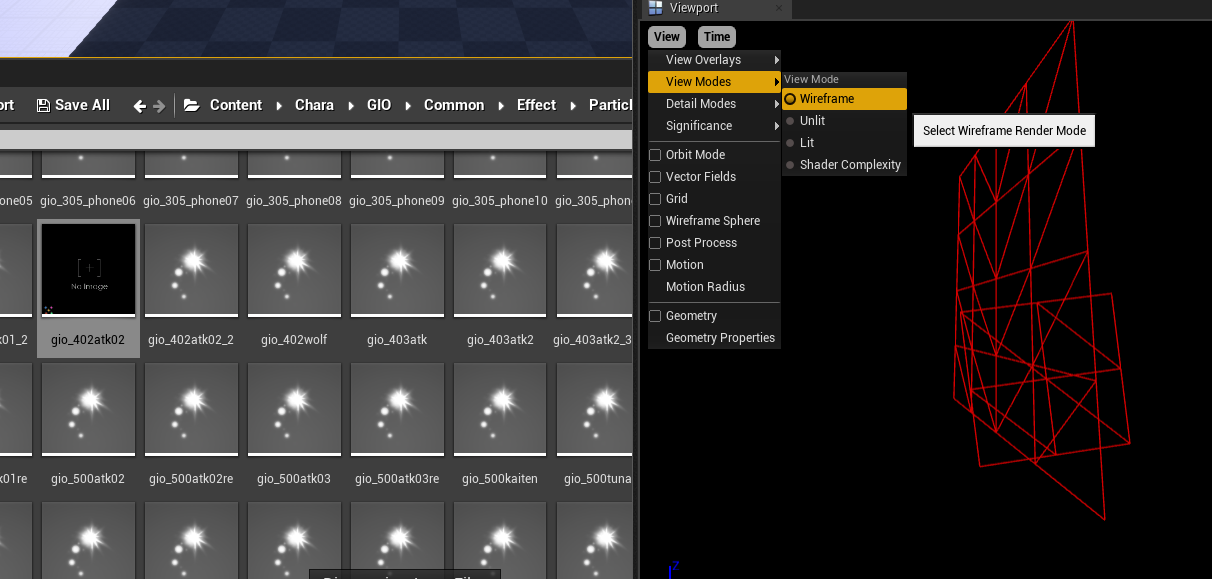
- You can view the material (and edit it to be white or something for easier viewing) using the individual particle "nodes" on the right.
- View it in Wireframe mode using the toggle at the top left.
- When you're viewing the file, it'll be all black. To fix this, either
uhhhhh use ParticleEditor or UAssetGUI to edit those once you're done. they're called ColorOverLife i'm too lazy to write more rn TODO: write moar
Moveset
Movesets are defined on a per-character basis in a custom scripting engine developed by Arc System Works. These scripts are called BBScript, but are often abbreviated to BBS.
BBS is a very well-documented and understood format, allowing us to not just alter characters, but create entirely new ones as well.
We highly recommend you read A Sketch of the Arc System Works Engine Script, by Pangaea, first.
For the sake of consistency, all example code uses internal ArcSys nomenclature. Game-specific code might be included where deemed necessary.
Extracting & injecting BBS
Automated method
TODO: Upload generic versions of Broscar's DBFZ scripts
Manual method
Manually extracting and injecting scripts is preferred if other assets need to be packaged.
Bulk extracting all BBS from the game
Open the game's pak in FModel, and open the package search window (Ctrl + Shift + F). Type in
BBS_. Select all items in that window (Ctrl + A), right click, and select 'Export Raw Data (.uasset)'.The files will appear in the 'Output' directory, but with their original folder structure intact, which can be time consuming to work with. To consolidize all of these BBS files, you can slap any of these scripts into your FModel directory. When you run it, it'll copy all BBS files into a single folder named 'bbs'.
TODO: Slap scripts into a github and just offer download links. Also, create a Windows batch version.
#!/bin/bash
mkdir -p "./bbs/"
for f in `find "Output" -type f -name "BBS_*"`
    do cp -f "${f}" "./bbs/"
done
Extract a script from the .uasset/.uexp
Using Pangaea's ggst-bbs-unpacker, scripts (and other ArcSys binaries) can be extracted. After exporting the .uasset from FModel, open the .uasset and .uexp files using ggst-bbs-unpacker. Then, click Extract and save it in a location of your choosing.
Parse the script
Using Pangaea's BBScript tool by itself, you will need to use the command line. If you have never used the command line before, find a tutorial on it first.
In the command line, run ```cmd bbscript parse
where <config> is the matching configuration filename in static_db, <binary> is the extracted script, and <text> is the file to parse to.

<div class="warning">

If the file to parse to already exists, an error will be thrown to prevent accidental overwriting. If you do wish to overwrite the given file, put `-o` after the command.

</div>

### Rebuild the script

The BBScript tool can also rebuild scripts from text back into binary form.

In the command line, run ```cmd
bbscript rebuild <config> <text> <binary>
where
is the matching configuration filename in static_db, is the modified text, and is the script to write to. Inject the script back into the .uasset/.uexp
ggst-bbs-unpacker can also inject scripts and other binaries back into the .uasset/.uexp. Open the original .uasset and .uexp. Then, select the file you wish to inject. Finally, click Inject.
Learning BBS
The two best tutors to learn BBS from are ArcSys and yourself. Read the vanilla game scripts, try to understand them, and go in and get your hands dirty. Learn by experimentation.
Having said that, we're not throwing you completely into the deep-end. What follows on this page is a sort of quick overview of how BBS is structured.
If you want an actual glossary encompassing nearly everything BBS, check out BBScript Documentation (Strive), DBFZ BBS doc or DBFZ BBS Lookup.
Note that the latter uses Broscar's bbscript for the
name_givenfield and any code examples, so you can't directly copy-paste those unless you use the same system.State
The very basis of a move. The game reads and executed a state from top to bottom. This is called the program flow.
When a state ends for a character object, that character object is returned to a neutral state by native code (
CmnActStandwhile standing, 'CmnActCrouch' while crouching, orCmnActJumpwhile airborne). When a state ends for an effect object, that effect object is deactivated.If you require players to be able to enter a state directly (e.g. through user input), you'll have to register it with
addMoveandregisterMove. However, that is not needed if you only interact with a state by jumping to it.Subroutine
A subroutine (or function) is a separate block of code that can be reused in any state. It cannot contain sprites, but all other elements of BBS are usable.
Think of calling a subroutine as copy-pasting the contained code into the part of the state you call it in.
Subroutines are usually used to share one block of code with multiple different states. For example, if several special moves share common code, a subroutine could be used.
If a subroutine starts with
cmn(not case-sensitive), that means you'll find that specific subroutine insideCMNEF, and not inside the character's script.Labels
Normally, states are run from top-to-bottom. However, with labels, you can instead have the game jump to a specific point within a state.
Label: s32(loop)
CellBegin: s32(xxx034_13), 3
CellBegin: s32(xxx034_14), 3
CellBegin: s32(xxx034_12), 3
CellEnd:
Goto: s32(loop)
The above code runs an indefinite loop. However, this isn't very useful by itself. Instead of
Goto, you can instead writeID_GotoIfOP2: s32(loop), (IS_LESS_OR_EQUAL), var(ActionTime), int(60). Now the loop will run until ActionTime hits 61. ActionTime is a variable that tracks how long an object is in a certain state in terms of frames. If ActionTime is 61 or more, the gotoLabel function does not trigger, and regular state flow is resumed from that point onwards.You can find more functions like
Gotoby visiting DBFZ BBS Lookup and clicking on the 'Flow' button next to the search bar.Variables
Interrupts
Also known as
uponin the standard BBS dialect.An interrupt executes a bit of code the moment its condition is triggered. This happens independent of the script flow, meaning you can allow your objects to react to an event the moment it actually happens.
ActionBegin: s32(ExampleMove) {
    InterruptBegin: (IMMEDIATE) {
        copyVar: var(act1), int(0)
        InterruptBegin: (IDLING) {
            if: var(act1) {
                addTension: 20
            } endIf:
        } InterruptEnd:
        InterruptBegin: (RECEIVE_ATTACK) {
            clearRegisteredUponCode: (IDLING)
        } InterruptEnd:
    } InterruptEnd:
    CellBegin: s32(avp022_01), 1
    CellBegin: s32(avp022_02), 1
    CellBegin: s32(avp022_03), 1
    OpCopy: var(act1), int(1)
    CellBegin: s32(avp022_04), 1
    CellEnd:
} ActionEnd:
When you register an interrupt, you also define what code runs when it is triggered. As you can see, calls to set interrupts can also be nested.
In the code above,
InterruptBegin: (IMMEDIATE)activates before everything else, even before the first sprite is drawn. It also registers two new interrupts.IDLINGruns every game tick.As an extra challenge, try to understand what this entire block does.
CMNEF
CMNEFis a special BBS file used to share states and subroutines among all objects in the game. This makes it extremely potent for applying changes that affect all characters and all spawned effect objects.However, if you alter it, it means your mod becomes incompatible with any other mods that change it.
In short, if you're creating a single custom character, you're better off not changing it. If you're making a complete overhaul / balance patch, use and abuse it.
Signals
Interacting with other objects
applyTo, triggerUponInObject, signals, copyVarFromObject, linkObject
Examples
Here is a document listing several techniques and how one can choose to implement them:
TODO: Split off the BBS snippets from the DBFZ Google Doc into their own document.
- Armor
- Locking out moves
- Revive on death
Tips
In 10.1 there's a section called
Bulk extracting all BBS from the game. If you parse all of them, you can use them to find the various uses of a certain bit of code in all vanilla game scripts. Notepad++, for example, allows you to search for bits of text in multiple files (ctrl+shift+f). Just point it at the directoy where all those parsed scripts are stored, and you're good to go!How BBS works in-game
Generic states
The native code of the game looks for, and uses, several default states. This means the developers don't have to explicitly handle generic state transitions. If a standing move ends, characters start looping
CmnActStand. If a character gets hit, they'll go into the state that matches the hit reaction.Native code is also able to affect script flow within those default states.
ActionBegin: s32(CmnActJump) {
	Label: s32(_Upper)
	Label: s32(upperloop)
	CellBegin s32(kfs021_00), 3
	CellBegin s32(kfs021_01), 3
	CellBegin s32(kfs021_02), 3
	CellEnd:
	Goto: s32(upperloop)
	Label: s32(_UpperToTop)
	CellBegin s32(kfs021_03), 2
	CellBegin s32(kfs021_04), 2
	CellBegin s32(kfs022_00), 2
	CellBegin s32(kfs022_01), 2147483647
	Label: s32(_Top)
	CellBegin s32(kfs022_02), 2147483647
	Label: s32(_TopToDown)
	CellBegin s32(kfs022_03), 3
	CellBegin s32(kfs022_04), 2147483647
	Label: s32(_Down)
	Label: s32(downloop)
	CellBegin s32(kfs022_05), 3
	CellBegin s32(kfs022_06), 3
	CellBegin s32(kfs022_07), 3
	CellEnd:
	Goto: s32(downloop)
} ActionEnd:
As you can see, there are several different labels in this
CmnActJumpstate, but you won't ever find a function that actually jumps to_TopToDown. Instead, the native code does so itself when the proper conditions are met (e.g. airborne, Y-speed less than 0).Native code can also add function calls whenever it detects certain active state names. For example, DBFZ's
CmnActMikiwameMove(Vanish) will initiate a worldStop, even if all relevant calls in the script have been deleted.Generic subroutines
Native code is also able to call a subroutine for an object of its own accord. Here are a few notable ones:
Subroutine Functionality OnIdlingCalled every game tick, no matter which state the object is in.
Affected by worldStop.OnLandingOnDamageOnGuardOnFrameStepCalled every game tick, no matter which state the object is in.
Not affected by worldStop.For DBFZ, OnIdling is called even for assist characters that are off-screen.
Thinking outside the box
BBS allows you to do much more than simply change damage numbers and spawn projectiles.
Although it's a bit limited by the very nature of functioning inside of a fighting game framework, you can effectively achieve nearly anything you want with it, as long as you're willing to get creative.
This page serves to highlight a few of these techniques, and lists some examples of what is truly possible with BBS.
Utilising secondary 'helper' objects
Changing character moves by only changing CMNEF
Dynamically altering the move registry
Examples
- Stage hazards in DBFZ
- Lethal League in DBFZ
- FPS in DBFZ
TODO: Actually make these things publicly available and do small write-ups on them.
Per-game BBS specifics
Although the concept of BBS is shared among all modern Arc System Works games, their exact implementation still differs per title.
In this section, you'll find various bits of information pertaining to BBS in their respective games. This includes tweaks, bugfixes, and other bits of documentation managed by the community.
Strive
DBFZ
Bugs
- BRS: Replace createParticle:
s32'bg_ roundsmokeL', 0withcreateParticle: s32'bg_groundsmokeL', 0 - ASN: Do a global search and replace to turn
Don’tintoDont - JNNEF: Do a global search for
KidanFire', 0, 100and remove the odd symbol at the beginning of every one of them. - FRN: The subroutine named
FDownLoop_Typeis missing 1 function.- Add
storeValue: (VARIABLE), 52, (STATIC), 1if you're using old bbscript. - Add
storeValue: Mem(52), Val(1)if you're using regular bbscript 1.0(+). - Add
copyVar: var(act7), int(1)if you're using Broscar's bbscript. - Add
Unknown46: Unknown, Unknown, Unknown, Unknownif you're using Burritoscript.
- Add
Broscar's workflow
A consequence of DBFZ barely having any modders active in BBS, is that Broscar has been pushing forward solo, with little regard for existing BBS conventions. You may choose to go along for the ride.
Pros Cons Easy to use tools that allow for very fast iteration The first setup requires a bit more work Detailed documentation Uses a different 'dialect' of BBS.
All concepts of BBS still apply, but functions and variables use different keywords.Automatically fixes the parser bugs for BRS, ASN and JNNEF Assumes you have some experience with programming Has better indentation, code folding and works with the Function listfeature of Notepad++https://github.com/dobosken/bbscript
https://github.com/dobosken/dbfz_npp
https://dobosken.github.io/dbfz_bbs_lookup/
TODO: Clean up and share build scripts. Check if ye olde Windows versions still work.
UI Modding
Due to limitations of creating custom projects in earlier Unreal Engine versions, this section is not applicable to Dragon Ball FighterZ or Granblue Fantasy Versus. At the current moment, it is not currently feasible to mod UI in those games.
If you are modding Guilty Gear -Strive-, DNF Duel, or Granblue Fantasy Versus Rising, continue with this section.
UMG basics
UMG (Unreal Motion Graphics) is the built-in UI framework in Unreal Engine, and is what Team RED uses in all of their games for UI. As such, learning the basics of UMG is critical to modding.
This topic is beyond the scope of this guide, but I will leave useful resources for using UMG here:
- The official UMG quick start guide
- UMG Basics (How To Create UI) by Smart Poly
- Your First Hour in UMG
Once you feel like you have a decent grasp on UI modding, proceed with this section.
Finding widgets
In Team RED Unreal Engine 4 games, all widgets can be found in RED\Content\UI. The overall contents of the folder differ per game, but names are fairly consistent.
- The HUD for battles can be found in UI\battle in most games. In Strive, it can be found in UI\Battle_Xrd3.
- Widgets with Allset in their names refer to the "master" widget. This widget is the one that's directly displayed, containing all other widgets used for its section.
- Strive tends to postfix its UI folders with Xrd3. This was the codename for Strive during development.
Look inside the folder in the custom project, and try to find the UI element you're looking for. There will be a visual preview of the widget upon opening it. Once you find it, feel free to get creative! Design is incredibly subjective, so I will not provide a tutorial on that. But before you do, make sure to check out the next page, as there are several common pitfalls that could ruin your mod.
Common pitfalls
Modding UI can be quite complicated, and you may run into crashes. Here are several of the common pitfalls I've personally run into, and how they can be avoided.
- If the game crashes upon loading the UI element, there is a very good chance that you deleted a part of the widget. Never delete parts of the widget, as the game may try to reference it. Even something as innocuous as a text box could crash the game if it was missing. Instead, set its visibility to Collapsed.
- (Strive/DNF) If your UI elements don't appear in-game, you most likely did not package the Allset widget. In earlier versions of Unreal Engine, the widget hierarchy is "baked" into every widget, and only the directly created widget has its hierarchy referenced. This means that all of your changes to the child widget will be disregarded unless you also package the Allset widget.
- Some widgets may also contain Blueprint code. If this code is not properly replicated, the game may act unpredictably. Replicating this code deserves a section of its own, but I will leave you with the primary tool I use to replicate blueprint code: kismet-analyzer by trumank.
- If parts of a widget show up as pure black in the editor, they probably use a material. The material can be found under the Details panel for the UI element. The autogenerated materials are broken by default for UI elements, but they likely contain a texture that can be used to preview the material. You'll know if it's the right one because it will resemble the UI element in-game. Simply plug that texture into Final Color, and its alpha channel into Opacity and Opacity Mask.
Code
Code mods are the "holy grail" of modding in any game. Being able to change how the game works at a fundamental level will always be incredibly powerful. However, such power requires programming experience and intimate knowledge of the game internals.
Luckily, Guilty Gear -Strive-'s arcade version shipped with debug symbols, which gave tons of insight into how all Team RED games work, and especially cracked open Strive.
Additionally, various breakthroughs in the last year of Unreal modding has made making code mods for UE4/5 games easier than ever. The advent of UE4SS revolutionized code modding for Unreal Engine games, with its ability to create Lua, Blueprint, and C++ mods.
As code modding is such a broad topic, this section expects a basic understanding of how to use C++ and how to use a disassembler. Any disassembler may be used, but this guide will assume the use of Ghidra, as it is the best open source option.
Creating a .pak archive
You're going to need UnrealPak to do this section. Download it here; UnrealPak
If you would rather a video overview, see below;
First: the prerequisites. In order to package your mod, the folder hierarchy must follow the rule of
ModName\RED\Content\, with the rest of the hierarchy matching the asset's original path.As an example, if I am modding the asset sol_body in folder
RED\Content\Chara\SOL\Costume01\Meshand the mod is named LabcoatSol, I would:- take my cooked files from my cooking directory; this is in
/[ProjectName]/Saved/Cooked/WindowsNoEditor/[ProjectName]. - make a few folders in my UnrealPak directory; specifically, you want
(UnrealPak)/ModName/RED/ - copy Content from your cooking directory into there, so your directory tree looks like
(UnrealPak)/ModName/RED/Content/Chara...
Actually packaging your mod is quite simple: simply drag the mod folder onto the
UnrealPak-With-Compression.batfile. It should spit out a file with the same name as the mod folder, but with the .pak extension.Now, you can use this as a mod. More detail on the installing page.
Installing your mod
- Enable Column mode
- Export as FBX with these settings:
- To edit anything select the Armature and go to the Pose mode. Move/Rotate/Scale each bone as you want. Press "I" and choose "Location, Rotation & Scale" if you use Blender 3.6 version.
- Set Frame Rate to 60
- Delete Icospheres, or set the Viewport Display under Armature on your armature (green skeleton in Details) to Octahedral/Stick, depending on preference. You can completely hide it as well.